
Automating the Creation of TCM Security's PEH Home Active Directory Labs - It's Terra-fying
A guide on how to terraform the Active Directory Home Lab from the Practical Ethical Hacking course by TCM Security - and coincidentally - My first attempt at Infrastructure-as-Code and DevOps!


I remember reading a while back about something cool... Someone had re-created the home Active Directory Lab from The Cyber Mentor's Practical Ethical Hacking course in Azure - Check that out here. I was pretty inspired and thought to myself: "Wow, that would be really handy!". Then I read Rastamouse's blog post about using Terraform to create Red Team Infrastructure on-demand, and marveled at "Infrastructure-as-Code". Jeez, this is even cooler, I thought. Then last weekend I came across chvancooten's CloudLabsAD - A fully automated deployment of Active Directory, an Elastic stack for logging, and an attack box. It uses BadBlood to populate the Active Directory like a real company, with misconfigurations to boot. That's just incredibly handy, right? So I thought "Toby, what can you do that is going to be both useful and feasible for someone with no DevOps experience?"... And I came to the conclusion that re-building the Active Directory Labs from the Practical Ethical Hacking course in the cloud would be a good idea, but instead of doing it manually, I'd incorporate the techniques I'd read about from chvancooten and Rastamouse. If you're here to get a vulnerable AD lab on demand, I recommend you go look at their code, it's far more sophisticated than my attempt here. Consider this my initial foray into the world of DevOps.
In this post, I'll show you how to set up Azure in your Kali Linux instance, get a free account with $200 (if you haven't already), then we'll download Terraform, and automate the creation of the lab in TCM Security's course - the MARVEL domain. We'll be mindful of security, exposing the public IP address of the lab to only allow access from our whitelisted IP, and we'll use a NAT gateway to ensure that the outbound traffic is showing an alternative public IP. We're doing this from Kali because if you're following along from TCM Security's Practical Ethical Hacking course it's probably where you're working from anyway!
The code uses Terraform to instantiate our resource group, add the necessary resources, and then after the provisioning of the Virtual Machines in the cloud, we use Ansible to push the required configurations out. Let's get started!
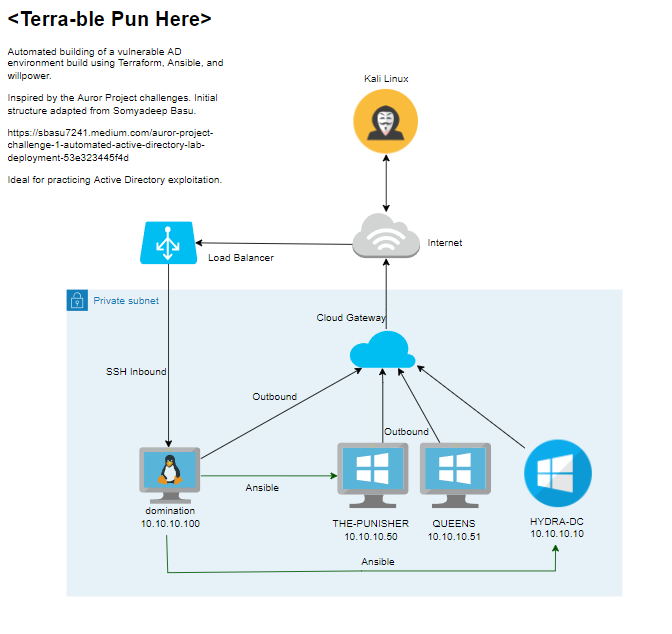
Mapping our Design
It's really important to have a high-level overview of what our required design looks like. Here is the blueprint, and also the eventual IP addresses, for you to refer to later when attacking the internal network.
Setting up Azure
Depending on what distribution and version you are using, you should alter the following command as necessary. Here are the versions available, and they will correspond to the version of Debian/Ubuntu you are using. For the purpose of this tutorial, you should note that some commands may differ slightly if you are not using the same OS as me. Once again, I am doing this on Debian 11 - Kali Linux specifically.
curl -sL https://aka.ms/InstallAzureCLIDeb | sudo DIST_CODE=bullseye bashIf you're stuck, refer to the Azure CLI docs.
Once installed, run azure login in the terminal and provide your Microsoft Azure account credentials to connect to your CLI session. If you don't yet have an account, ensure to sign up on the official Azure page using your current Microsoft account. You get some free credit too - $200 or about £159. I'd honestly recommend upgrading to the "Pay-as-you-Go" tier from the free tier as you keep your $200 for 30 days and can run machines with up to 10 CPUs overall vs only 4 CPUs on the Free Tier. For the purpose of this guide, you will need to be on a Pay-as-you-Go tier to avoid having super slow machines. This is to allow us to use specific VM sizes with adequate CPU/RAM. You still get the $200 free so won't be paying for anything! Obviously, you need to set yourself a reminder to cancel it before your 30-day free credit is over. If you'd rather continue beyond the free quota, I left the whole setup domain running for 12 hours and it cost about £10, so it'll cost you just under a pound an hour. That's acceptable for me, for convenience. Your mileage may vary and I cannot be held accountable for any charges you incur after your free credit runs out!
NOTE: PLEASE REMEMBER THAT YOU WILL HAVE TO DESTROY YOUR INFRASTRUCTURE OR POWER IT OFF WHEN DONE.
After logging in, you should see a bunch of JSON. Take your id parameter and use it to set the account you're using.
az account set --subscription "3dafe231-your_id_here"Installing Terraform
I've made a small install script for Terraform. Again, this is designed to be run from Kali as it was just the system I was on at the time of doing this. You'll update the buster to whatever equivalent you're using, or just swap it for $(lsb_release -cs). Save this as install.sh and then run chmod +x install.sh and finally ./install.sh.
#!/bin/bash

# Ensure system is fully up to date and ensure we have the necessary pre-requisites
sudo apt-get update && sudo apt-get install -y gnupg software-properties-common curl

# Download Terraform's GPG Key > apt-key is getting deprecataed so updated the method used
curl -fsSL https://apt.releases.hashicorp.com/gpg | gpg --dearmor | sudo tee /usr/share/keyrings/terraform-archive-keyring.gpg

# Add the official Terraform repository to our sources repository
# As per step 1 and no longer using apt-key, we must use sources.list.d with the name of our gpg archive
# Since kali isn't supported directly we'll use the debian 10 equivalent - buster
# https://discuss.hashicorp.com/t/unable-to-add-hashicorps-repo-corretly/24048 suggests this isn't an issue
echo 'deb [arch=amd64 signed-by=/usr/share/keyrings/terraform-archive-keyring.gpg] https://apt.releases.hashicorp.com buster main' | sudo tee /etc/apt/sources.list.d/terraform.list

# Install terraform
sudo apt-get update && sudo apt-get install terraform

# Check it installed
check=`terraform -version`
confirm='Terraform v'

if [[ "$check" == *"$confirm"* ]]; then
	echo "[Terraform Installed]"
	echo $check
else
	echo "[Error installing Terraform]"
fi

# Add tab autocomplete
terraform -install-autocomplete
echo "[Autocomplete Added] Restart your current terminal window to take effect."
There we go, that should all be finished.
Back to Azure
Now we want to set a subscription principal - This will enable Terraform to interact with Azure on our behalf. Take your subscription ID again and run the following command:
az ad sp create-for-rbac --role="Contributor" --scopes="/subscriptions/1fb5b643-your_id_here"If you're like me, doing this on Kali, you may get an error about RoleAssignmentOperations having no attribute config. This is referenced here:
 Azure
AzureCreate this file on the system: /etc/apt/preferences.d/azure-cli.pref.
Package: *
Pin: Release o=azure-cli bullseye
Pin-Priority: 600
Then perform a downgrade to use the Microsoft version rather than the Debian version.
sudo apt install azure-cli=2.36.0-1~bullseyeRunning your original command again should now show your appId, displayName, password and tenant. These are private. Keep these safe. The Terraform official guide recommends setting them as environment variables.


export ARM_CLIENT_ID="<APPID_VALUE>"
export ARM_CLIENT_SECRET="<PASSWORD_VALUE>"
export ARM_SUBSCRIPTION_ID="<SUBSCRIPTION_ID>"
export ARM_TENANT_ID="<TENANT_VALUE>"That should be Terraform all set up - Recheck that you entered the values correctly and if you're struggling, go to the above link from Hashicorp and follow the example with them.
Cloning the Repository and Terraforming
Now we'll clone my repository located at:
git clone https://github.com/heartburn-dev/vulnerable-ad-terraform.gitThen we'll enter the Terraform directory.
cd vulnerable-ad-terraform/TerraformNow we'll initialize Terraform here.
terraform initFinally, we'll run terraform apply and enter our public IP from http://ipv4.icanhazip.com/. This will be the whitelisted IP that can SSH into the network, so ensure it's correct otherwise you'll have to rebuild! When prompted, enter yes and then let the magic happen. It should take between 10-15 minutes generally to be complete. If it says something failed, give it time, it will generally get it before the retries run out. Sometimes certain components just take longer to start again.
Attacking the Network
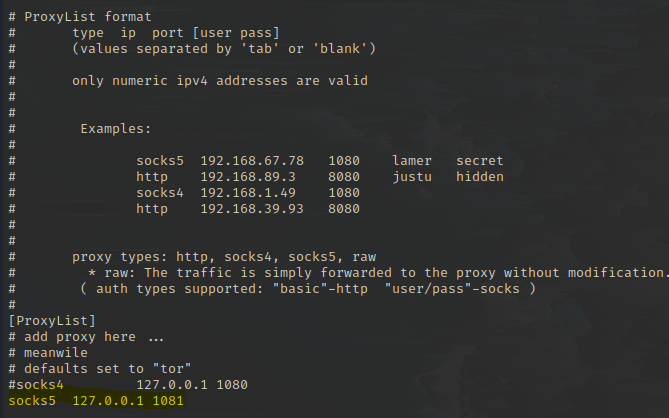
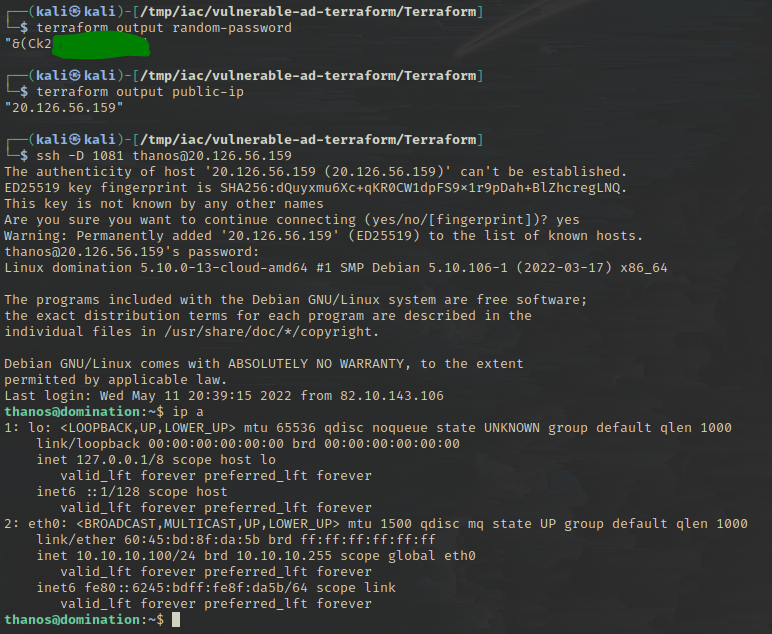
Now everything is installed and should be running as expected. When the script is finished, there should have been some output that shows the public IP address of our instance. We'll get the sensitive password that was generated by Terraform by running terraform output random-password. Now we have both the items we need to log in to the jump box. I personally like to run it through a proxy, so I can use my local Kali tools over proxychains to attack the internal network. First, we'll update our /etc/proxychains4.conf file and add socks5 127.0.0.1 1081 to the bottom.
ssh -D 1081 thanos@<public_ip>Enter the password when prompted and you should now be on the jump box. Here you should have an internal IP, viewable by typing ip a of 10.10.10.100. You can see how to access the jump box using the screenshot below.
Since we've proxied our traffic, you can now use most of your tools with proxychains on your host to reach the internal network. You can try this by typing:
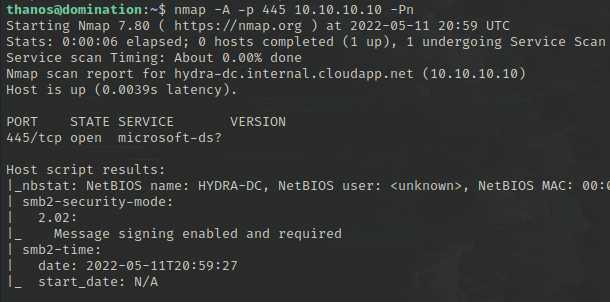
proxychains smbclient -L \\\\10.10.10.10\\This should allow your Kali box (External) to access port 445 of the Domain Controller (Internal) using proxychains! Neat. However, it's also possible to just run it from your jump box directly, as proxying traffic adds unnecessary latency.
Running an nmap on the domain controller at 10.10.10.10 should also be possible. You can now download tools and perform attacks as you would do from your host machine from the jump box itself - It has internet for you to download everything you need, such as the impacket toolkit.
Marvel Domain Overview
So with everything finished, I'll just leave a quick overview of the domain so you can navigate it, though you can see all the details in the code on GitHub. The password for the jump box account thanos gets generated randomly when the code is run - so you'll have to access it as previously discussed using terraform output random-password.
The user accounts set up on the domain all have their passwords stored in the description, aside from tstark who is the Domain Administrator. His password is the same as terraform output random-password and they are listed below:
- marvel.local/fcastle : Password123!
- marvel.local/pparker : Password1234!
- marvel.local/tstark (Domain Administrator) :
terraform output random-password - marvel.local/SQL-SVC (Kerberoastable User) : Passw0rd123
The computer accounts are:
- HYDRA-DC.marvel.local - 10.10.10.10
- THE-PUNISHER.marvel.local - 10.10.10.50
- QUEENS.marvel.local - 10.10.10.51
- domination - 10.10.10.100 (Jump box)
As you can see above, I added a Kerberoastable user to give an initial vulnerability to practice. You could abuse this with impacket:
GetUserSPNs.py 'marvel.local/fcastle:Password123!' -dc-ip 10.10.10.10 -requestThis should provide the hash of the SQL-SVC account, which you could take to crack offline.
If you want to RDP into one of the Windows machines, we can do that over our proxy. This can be done by any user.
proxychains xfreerdp /v:10.10.10.50 /u:tstark /p:"<password>" /d:MARVEL /cert-ignoreDestroy your Infrastructure
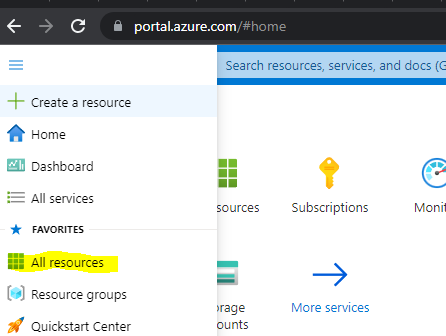
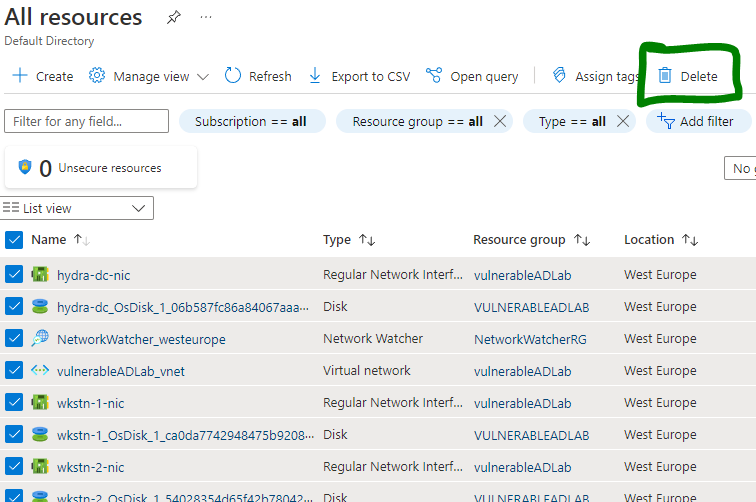
When you're done working for the day, you have a few options, and ensure you choose one to avoid running out of your free credit/spending loads. To get rid of your infrastructure, in the same directory that you ran terraform init, you can run terraform destroy which should destroy everything that was created. If you're struggling, worried, or there is an issue with terraform destroying a resource, you can go to https://portal.azure.com/, then click on "All Resources" in the sidebar.
Highlight all the resources and then hit delete.
If this still doesn't work, I'd advise contacting MS support or re-running terraform apply in the same directory and then terraform destroy again to see if it sorts itself out. This has generally been the case for me on a couple of occasions.
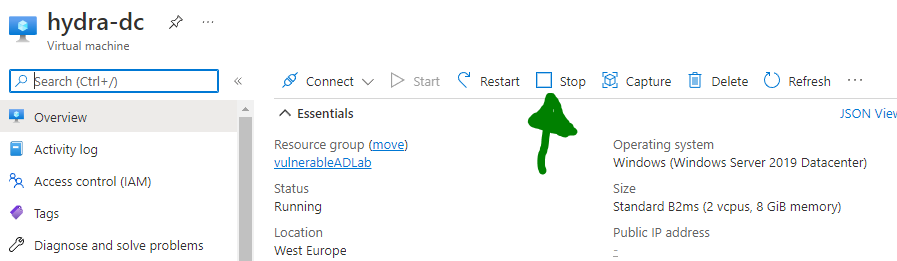
Alternatively, you can just open up the resources in your Azure portal and click on "Stop" when you're not using them!
Wrapping Up
If you're still here, nice one! You should hopefully have an automated Active Directory deployment system in place now and understand how to spin it up and destroy it whenever you need to. Whether it's actually useful to you, who knows! I personally prefer just being able to spin stuff up in the cloud for testing rather than messing around with VMs, but the trade-off over time is that it costs. However, with the free Azure credit on a Pay-as-you-Go account for 30 days, it's well worth a try. My forays into DevOps stop here whilst I dive back into pentesting practice over the summer, so it may be a little while between posts again! Take it easy.